SwedeSpeed - Volvo Performance Forum banner

Control arm bushings check

10K views 32 replies 8 participants last post by  Leto Atreides II  
#1 · (Edited)
I've noticed some poor handling while cornering and braking, and thinking it might be the control arm bushings. Because I'm indecisive and haven't actually looked at enough bushings when I know they're good, I'm sharing some pics to check my eyes.

This looks like it's tearing (driver side front bushing)
Image


And this looks like it's pretty much completely torn (passenger side front bushing)
Image


Right?

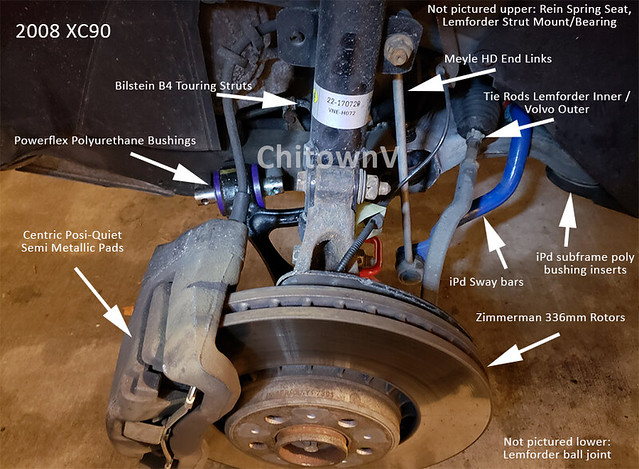
Reading through the multiple LCA threads on here it looks like the best choices are OEM bushings or poly Powerflex bushings. I'm thinking to replace the front/rear LCA bushings with the Powerflex bushings. Maybe ask the neighborhood garage to press them in and out for me...
 
#2 ·
The bushings look pretty cracked. Driving on a straight road, apply the brakes. If the car pulls left or right, the bushings are worn out. I would look at fcpeuro.com for new control arms. You need special tools to press the bushings out and back in. If you do replace the bushings only, take pictures of how both front and rear bushings are installed in each control arm. It is very easy to press them in wrong or not centered if you have never done this before. If the front and or rear bushings are pressed in too far or not far enough, this can throw off the alignment. It looks like you have the cast iron control arms. Earlier XC90's had aluminum front control arms.
 
#3 ·
Yup, tearing and separating. Those look worse than my original rubber bushings when it started to experience highway wander, including the steering easily following the road crown (this was after an alignment too).

Of course I would go for the polyurethane and literally everyone who has them installed on their XC90 has positive reviews about them. The little bit of effort getting polyurethane installed is well worth it for the tens of thousands of miles and hundreds (if not thousands) of hours driving.
 
#4 ·
#7 ·
I've pressed the front and rear bushings in and out a few times. The trouble with pushing the bushing sleeves is usually a matter of finding the correct diameter tool., and then it can still "rock" out of alignment. I would be surprised that the "C" clamp could exert enough pressure to move the sleeves. It was tough going with a press. The proper tool would have a step around the circumference to keep it aligned, and would be some thousandths of an inch smaller to enable it to pass through the journal.
Some folks have removed the bushings by threading a hacksaw blade through the bushing, re-assembling the saw, and cutting bits out incrementally. Once the rubber is out, the hacksaw can score the sleeve in two parallel locations abou1/2" to 3/4" apart, so that a cold chisel can knock out the strip. Getting the rest of the sleeve out is much easier. Some folks have made only one cut, and some have made cuts 180 degrees apart. It's a matter of care and patience, but it's important not to booger up the control rod interior journal.
I have both front and rear Powerflex, and love them dearly. Installing them really does need a press, although I read somewhere that installation can be achieved with a vise. I found that pressing the poly bushings in was like scenes from the old "Flubber" movie with the bushings escaping and bouncing all over the shop. Ultimately, I found that the best way was to be sure and clean up the leading chamfer on the control arm, and then pushing the arm down onto the bushing, using a flat plate on the open journal end and pushing down on that.
For the cost of the Harbor Freight press, I would think it would cost less than having a shop R&R the bushings, and then you'd have a fun new tool! Amazing how handy those things are.
 
  • Like
Reactions: ChitownV
#6 · (Edited)
I'm guessing no. Those bushings are in waaay tight, I cut a set of rears out and tried a good quality bushing set to put them back in to no avail, couldn't even get them started. Ended up having Honest Jack's over on Rainer do them for me, can't recall what I paid but was not cheap.

It's not for me personally but you could cut out the fronts and go poly as noted earlier. I'll guess the rear bushing is probably in decent condition so you cold get away with just replacing the fronts.

I prefer the OE LCA myself, put a set of IPD on the Ocean Race last year and can already feel them getting a bit loose. I'll replace with a re-bushed set I have on the shelf the next time I do any work up front. Price on the Volvo part blows and includes a core charge so the need to send them back. Set of bushings will run you about $100 then you need to add the labor for replacement.

Really should use new hardware every time this part gets replaced, the bolts are torque to yield. PN 987456 for the 2 front bolts, 999403/985660 for the bolt/nut in back. Might consider doing ball joints as well while you're in the neighborhood, PN 31201485. Alignment after the work for sure.

I have a ball joint separator if you wanted to use it (easier than trying to bang them out) as well as an open socket set and Torx for the end links. Can also loan you my Dewalt impact gun and the usual dimension sockets if you were willing to come get it. You know where to find me if yes.

edit 051922, prefer, not perfer, couldn't.
 
#8 ·
We talked about pressing bushings in the specific posts (#79 - #86) in the thread linked below. You can continue past post #79 to see the answers because those of us who have done this ourselves comment on the different presses and challenges. I have pressed bushings on 3 sets of XC90 LCAs. I have pressed bushings on dozens and dozens of other vehicles.

@Capndirk is right, such as the diameter size and pressure needed. The size & space needed for large bushings meaning the "C" opening part of the C-clamp is not wide enough, the strength of the press (because they can break on you), etc. are other issues I have experienced. The suggested 12-ton H-frame press is also right on the money and anything smaller may not do the job.

 
#9 ·
One more link to the polyurethane bushing thread. Looks like years later, the polyurethane bushings are going strong with the same performance as day one. There is a video in this thread showing how bushings were changed with an H-frame press.

 
#10 ·
I don't think my wife will be okay with me adding a 12 ton press to the garage that she already thinks is too full, I'll check around what it will cost to have a garage do the pressing for me.

Thanks for the links, I've read through all these threads but they get so long it's hard to find just the right spot! :D
 
  • Like
Reactions: ChitownV
#11 ·
Also gotta say FCP redid their control arm video a couple weeks ago and it's much easier to see what they're doing than in previous video from 6 years ago.


The 1A Auto one is pretty good too.

 
#12 ·
Question: will the bushings include grease? Sounds like Powerflex includes some small packets of grease with the bushings, but wanted to double check what folks got.
 
#14 ·
It does, but just a little packet. Having used poly bushings on vehicles for over 25 years, the lithium grease can get washed out. I used iPd’s grease which is believed to be marine grease. It’s thicker and tackier so it doesn’t get washed out. I use iPd’s grease between the center shaft and bushing.
 
#15 · (Edited)
I thought Powerflex's grease was the tackier PTFE/silicone based lubricant, not lithium grease. They also call it a "copper based grease" on their FAQ. Edit: I think it used to be a copper-based grease but it's now PTFE/silicone.

 
  • Like
Reactions: ChitownV
#16 ·
That's what came with mine. A translucent, thick, tacky silicone type grease. I've pushed in 3 sets of bushings on my control arms, and they all had that. The first set of rear bushings were the purple street version, and one of them split. It was only visible when the car was jacked up, and showed no sign of migrating out of the journal, but I contacted them anyway, I sent pictures and my original invoice when I first contacted them, and they replied immediately with an apology and a tracking number for a replacement set. They sent the "Race" rear bushings for both sides and no BS about maybe bad install, send them to us, blah, blah, blah. Just "We're sorry; here's some new ones." Love those folks
Chitown is way ahead of the rest of us, and maybe got his before silicone grease was even invented 😊 I know he's mentioned having re-greased his bushes, and that was always a mystery to me, but it makes sense, now. The silicone grease just stays there on mine. Never a sound or any indication that new grease is needed.
 
  • Like
Reactions: ChitownV
#17 ·
Lol, maybe they did update it. It was a white grease and I assumed it was lithium. Happy to hear they made the update. It was a little amount so I did get the iPd grease just in case I screwed up I would have extra because they throw the small white grease packet in all of their kits, but the forward bushing is big on the XC90. I also wanted the extra iPd grease because of my past experience with lithium grease washing out in the winter salt season. Yeah, this iPd grease ain’t washing away and stays quiet even after driving in winters with a lot of road salt.

My iPd sway bars came with their iPd grease so I knew it would work for pivot points. Looks like people will do well using either grease. Just get the polys and you can’t go wrong. 😀
 
#18 ·
I just noticed the Powerflex instructions say to use something like dish soap to lubricate the bushing when installing into the bracket, then the supplied grease for the metal insert when installing the insert into the bushing. I thought everyone's been using grease for both the insert/bushing and the bushing/bracket. No? If we've got grease wouldn't that be better than using dish soap?
 
#19 ·
How about that? I really should have read those instructions better, it now turns out 🙁
It seems like the things are hanging in there, ok, but the soap makes sense. The outer part of the bush can sort of be glued in place, when the soap dries up, leaving the axles to do all the pivoting work.
Good catch!
 
#20 ·
Yeah, that’s the universal way to install any bushing, using soapy water. I used a spray silicone spray to install the poly bushings and it stays in place because the pivoting shaft pushes the bushing outward since the center hole is smaller in diameter.
 
#21 ·
Your life will be easier if you buy the whole control arm, most ppl here do that.
Pressing it in requires a hydraulic press, if you have one, do it.
Otherwise, a new CA is easier.
The price is not that bad. Check FCPEuro for pricing, LT warranty.

I installed Meyle a few yrs ago, and it has been fine. Check the DIY I posted on matthews XC90 forum.
 
#23 ·
Too late for that, already too far down the poly path. :LOL: The bushings arrived over the weekend. Now I need to make time to take the control arms off and figure out if I can tackle it myself or get a local garage to press them for me.
 
#25 ·
I don't have anything to compare it to, but I've had Meyle HD control arms installed for the last few years with no issues. Sure, they're probably not the best available, but I'd hazard they'd be just fine for the majority of drivers.

But anyway, OP is past this so best of luck with the PU install.
 
#26 · (Edited)
Ok, bushings installed. I didn't find a garage that wanted to help, though. I asked one a few minutes away but I don't think they've ever seen poly bushings like these before... The bushing lips really make it look like there's no way they fit in the hole. :LOL: He was afraid they'd rip apart when trying to press them in so wouldn't do it. Didn't believe me that they just squish enough to get in there. I borrowed a U joint press set from O'Reilly's:

https://www.oreillyauto.com/detail/...ols/9e8ada6cd6e2/rental-tools-evertough-ball-joint-u-joint-press-set/ren1/67045

A combination of that press, plus a hacksaw, a drill, a bench vise, and a 4 pound hammer got the old bushings out. The press, vise, and hammer got the new bushings in. It would have been a 100x easier with the right tools, but it's done. That took too much time though, now I need to find time to put everything back together.
 
  • Like
Reactions: ChitownV
#27 ·
Yeah, the poly bushing lips squeeze in there without the center pivoting shaft/arm. I wouldn't do this, but.....I did see a video where someone got the bushing mostly in by jacking it up against the frame of a vehicle. As long as you got it in there it will work. Those polys are pretty durable and more flexible than people think.
 
#29 ·
Lol. Just another note. The video I saw was not for the XC90. The poly bushing install was for an American truck and it was as backyard mechanic as it could be.

Looking forward to hearing your feedback on the new bushings once you put some miles on them.
 
#30 ·
All back together. I noticed the vertical bushing deforms quite a bit after all the weight is back on the arm. Does this look normal for other folks with the Powerflex bushings?

Image

Image
 
#31 ·
It should seat into place when the suspension is loaded. I see that the big washers are in place, and it should find it's way to the "home " position immediately. I have those black rear race bushings, too, and they stay right where they belong during use.
Be sure and get a good alignment. I have an extended alignment plan and have it checked every 5k miles when the rotation is done. From our friend ChitownV's thread, I took the instruction to insist on having the toe set to "0", and they always P& Moan about only doing it to specs, so I point out that "0" is within specs. So, the alignment report comes back and shows "0" left, "0" right, and "0" combined, as well as "0" thrust angle. Tires are wearing perfectly, and stability is excellent. No wandering or drift or any of the other BS worries about going "0".