With my current Propshaft issues I've been trying to find step by step instructions for overhaul of the darn thing. After a couple of days searching I found the TNN for the repair and thought I would share since this is much nicer to follow than VIDA. If your are getting a bad vibration under your pants this may be the culprit. I haven't included the removal and install instructions this is simply the repair of the joint itself, Perhaps another member will chime in.
Enjoy:
Drivetrain - Front Driveshaft CV Joint Service
NO: 46-10
DATE: 4-27-2007
MODEL YEAR:
1998- AWD (All Wheel Drive) Cars
SUBJECT:
Propeller Shaft Front CV (constant velocity) Joint Available as a Spare Part
DESCRIPTION:
![Image]()
The front CV joint for original equipment propshafts on all AWD cars is now available as a
spare part kit. This kit includes the boot, joint W/seals, cover, clamp, lock-ring, seals and grease.
SERVICE:
![Image]()
![Image]()
If the joint has failed, replace it according to the instructions in VIDA. Be sure to mark the rear flange of the shaft in relation to the flange on the rear axle, to prevent a vibration. Note that on some variants, different length bolts may be used at the rear for balancing purposes, and they should be installed in the same position they were removed from. The entire shaft should only be replaced if the center bearing has failed or if the tube is physically damaged.
![Image]()
Note: When handling a propeller shaft out of the vehicle, it is important to support it so that the boot on the center joint is not damaged. Allowing the shaft to fold at the center joint may cause the boot to be cut by the edge of the joint.
![Image]()
Note: It is normal for the front & rear joints to feel stiff when the propeller shaft is out of the vehicle. (These are not the same type of joints as the ones used on front axles.)
![Image]()
Note: The joint is not symmetrical. It should be installed according to the pictures.
![Image]()
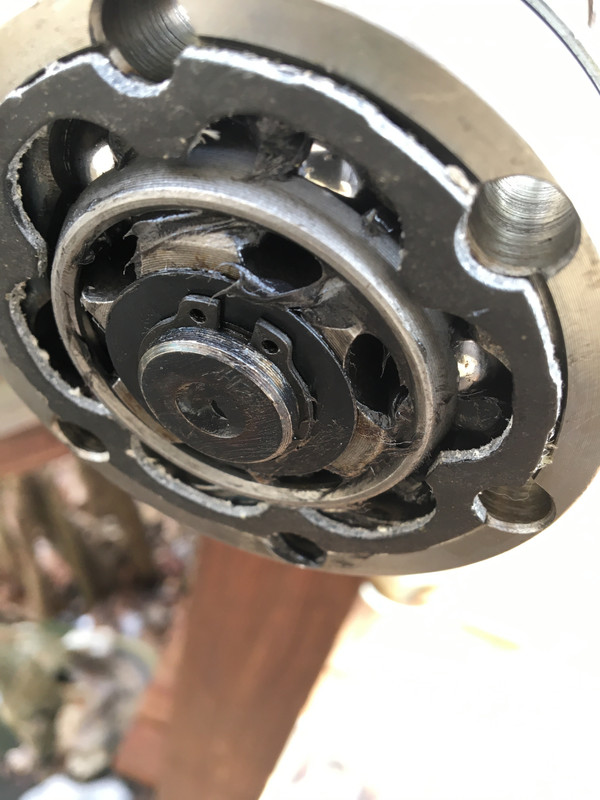
1. Pop off the front cover using a screwdriver.
![Image]()
2. Remove the snap ring.
![Image]()
3. Remove & discard the boot clamp (1).
![Image]()
4. Remove the joint from the shaft using puller 999 5427 or knock it off using a plastic mallet.
![Image]()
5. Clean the shaft and splines. Drop the new boot clamp onto the shaft.
![Image]()
6. Check that there is a gasket on each side of the joint & that they are properly positioned.
Squeeze the grease into the joint (2). There must not be any grease on the mating surface (1). Install the boot on the joint. Ensure that the holes are aligned.
![Image]()
7. Install the joint on the shaft. knock it into place using a rubber mallet. Use a socket as a spacer.
Install the snap ring. Check that it is in the groove.
![Image]()
8. Squeeze the remaining grease into the joint (2). The entire contents of the tube must be used.
![Image]()
9. Press the cover onto the joint, using 2 washers, 4 screws and 4 nuts. Tighten crosswise until the cover bottoms on the joint. Remove the screws, nuts and washers.
![Image]()
10. Press the air out of the boot. Ensure that the boot is positioned correctly on the shaft. Install the new clamp (1).
Personal note: I have not attached the labor codes as they are unreasonable time wise for any technician to complete repair. I do not want to make any tech's lives harder, especially the ones who are members on this site and provide assistance to the forum members free of charge.
Enjoy:
Drivetrain - Front Driveshaft CV Joint Service
NO: 46-10
DATE: 4-27-2007
MODEL YEAR:
1998- AWD (All Wheel Drive) Cars
SUBJECT:
Propeller Shaft Front CV (constant velocity) Joint Available as a Spare Part
DESCRIPTION:

The front CV joint for original equipment propshafts on all AWD cars is now available as a
spare part kit. This kit includes the boot, joint W/seals, cover, clamp, lock-ring, seals and grease.
SERVICE:


If the joint has failed, replace it according to the instructions in VIDA. Be sure to mark the rear flange of the shaft in relation to the flange on the rear axle, to prevent a vibration. Note that on some variants, different length bolts may be used at the rear for balancing purposes, and they should be installed in the same position they were removed from. The entire shaft should only be replaced if the center bearing has failed or if the tube is physically damaged.

Note: When handling a propeller shaft out of the vehicle, it is important to support it so that the boot on the center joint is not damaged. Allowing the shaft to fold at the center joint may cause the boot to be cut by the edge of the joint.

Note: It is normal for the front & rear joints to feel stiff when the propeller shaft is out of the vehicle. (These are not the same type of joints as the ones used on front axles.)

Note: The joint is not symmetrical. It should be installed according to the pictures.

1. Pop off the front cover using a screwdriver.

2. Remove the snap ring.

3. Remove & discard the boot clamp (1).

4. Remove the joint from the shaft using puller 999 5427 or knock it off using a plastic mallet.

5. Clean the shaft and splines. Drop the new boot clamp onto the shaft.

6. Check that there is a gasket on each side of the joint & that they are properly positioned.
Squeeze the grease into the joint (2). There must not be any grease on the mating surface (1). Install the boot on the joint. Ensure that the holes are aligned.

7. Install the joint on the shaft. knock it into place using a rubber mallet. Use a socket as a spacer.
Install the snap ring. Check that it is in the groove.

8. Squeeze the remaining grease into the joint (2). The entire contents of the tube must be used.

9. Press the cover onto the joint, using 2 washers, 4 screws and 4 nuts. Tighten crosswise until the cover bottoms on the joint. Remove the screws, nuts and washers.

10. Press the air out of the boot. Ensure that the boot is positioned correctly on the shaft. Install the new clamp (1).
Personal note: I have not attached the labor codes as they are unreasonable time wise for any technician to complete repair. I do not want to make any tech's lives harder, especially the ones who are members on this site and provide assistance to the forum members free of charge.
")