

Volvo XC90 & S80 V8 - How-To: Serpentine Belt, Tensioner & Idler Pulleys Replacement
Parts:
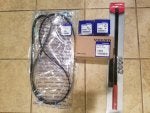
Volvo Drive Belt Idler Pulley - 31216198 - Qty. 2
Volvo Automatic Belt Tensioner Assembly - 31216199 - Qty. 1 (Comes with Tension Holder In-Place)
Volvo Serpentine Belt - 8653617 - Qty. 1
![]()
Tools:
Serpentine Belt Tool (Two Piece with 3/8" & 1/2" Drive)
T30 Torx
8mm, 10mm Sockets
Shallow 12mm, 14mm Sockets - 3/8" Drive
Shallow 19mm (12 pt) Socket - 1/2" Drive (6 Pt is preferred, but 12 Pt made it easier to line up how I wanted it)
12mm, 14mm Wrench
5/16" ID Hose & Plug
10mm Long Arm Allen Wrench and/or 10mm Allen Stub Socket (May Need to Cut 1/4" - 1/2" Off End) - I used a Husky brand wrench Model # HLAHKM13PC from Home Depot and did not have to cut it
Pipe, Large Adjustable Wrench, Long Handled Pliers, etc (Something to Leverage Allen Wrench)
View attachment 59839
^^^Thanks for the pic PAX5
Process:
Remove Front Engine Cover
Unclip Power Steering Reservoir from Coolant Reservoir for Better Access
Pop Off Passenger Side of Rear Engine Cover
Remove Top Passenger Side Engine Cover by Removing Two T30 Screws
![]()
Disconnect 5/16" ID Coolant Line from Block - Plug Block (I would stuff a lot of shop towels under nipple before pulling coolant line.)
Disconnect Ground Strap with 12mm (or maybe 10mm)
Remove 8mm Bolt Holding Power Steering Line to Block
Remove 10mm Bolt Holding A/C Line to Frame (Optional: Helps when removing top idler pulley bolt)
![]()
Unclip A/C Line from Power Steering Line for Better Access
Remove 10mm Nut Holding Power Steering Line Bracket to Tensioner
![]()
Connect 19mm (or 3/4") Shallow Socket onto 1/2" Drive Section of Serpentine Belt Tool
Place 19mm Socket onto 19mm Stub of Tensioner
Connect 3/8" Drive Section of Serpentine Belt Tool to 1/2" Drive Section of Serpentine Belt Tool in Dog-Leg Arrangement (Keep in mind you want to generate a downward and maybe slightly rearward force on the tensioner - My 1/2" Drive section was nearly horizontal)
![Image]()
Slowly and Steadily Apply Pressure (Towards Front of XC) to Serpentine Belt Tool with your Right Hand - It does not require major muscle. Just steady pressure over the course of 45 - 60 seconds.
As the Tensioner Gives Way, use your Left Hand to Reach Serpentine Belt on Top Idler Pulley and Pull It Off - Release Tension Slowly
![]()
Now, Begin Removing Parts for Replacement:
Remove Top Idler Pulley and Engine Hoist Bracket (14mm) - Don't Lose the Washer from the Pulley
Remove Lower Idler Pulley (12mm) - Don't Lose the Washer from the Pulley
Remove Tensioner:
Place 10mm Allen Wrench into Tensioner Bolt (Keep the Arm Accessible for Applying Leverage)
Use Chosen Device to Leverage Allen Wrench Loosening Tensioner Bolt (Do NOT Slip Off Wrench and Do Damage)
Once Tensioner Bolt's Initial Hold is Loosed, then Begin Trying to Remove Bolt
I was able to slip the Allen wrench into the tensioner bolt by holding the wrench horizontally and wiggling it into the bolt. I could then get a quarter turn on the bolt and then finagle the wrench back out and repeat the process until you are able to remove the bolt by hand. It doesn't take many turns before you can remove it by hand. If you've cut the wrench, it may be easier to do this. I was able to do it without the cut. (User "sebvox" was able to use a 1/2" chunk of the Allen wrench and a ratcheting box wrench for this step. That might be easier!)
Remove Top Bolt Holding Tensioner to Block (12mm Open Wrench)
Remove Serpentine Belt (If the belt is annoying you along the way, you can completely remove the tensioner before the idlers.)
You should now have all of the parts removed from the block which you're planning to replace.
View attachment 59837
Re-installation:
I started by verifying that my new belt matched my old belt.
Route New Belt Around the Toothed Pulleys.
Install Tensioner
Install Idler Pulleys
Finalize & Verify Belt Routing Leaving Top Idler Pulley for Last
Remove Tension from Tensioner (Same Method as Above)
While Holding Back Tension, Slip Belt Over Top Idler Pulley
Slowly Release Tensioner
Verify Routing and Mating of Belt
![Image]()
Once ABSOLUTELY SURE Belt is Routed Correctly, Remove Tension from Tensioner and Remove Factory Installed Tension Holder from Tensioner with Pliers or Screwdriver
Replace and reinstall all other parts, bolts, and connections in reverse of sequence above.
Thanks to these posts:
https://forums.swedespeed.com/showt...ead.php?203185-V8-Serpentine-Belt-Replacement-Special-tool-needed-for-tensioner
https://forums.swedespeed.com/showt...hread.php?170139-Tutorial-XC90-V8-Replacing-the-alternator&p=1850806&viewfull=1
And on a personal note, thank you PAX5 very much for the technical guidance, support, and encouragement to keep going despite the ridiculous heat today.
Parts:
Volvo Drive Belt Idler Pulley - 31216198 - Qty. 2
Volvo Automatic Belt Tensioner Assembly - 31216199 - Qty. 1 (Comes with Tension Holder In-Place)
Volvo Serpentine Belt - 8653617 - Qty. 1
Tools:
Serpentine Belt Tool (Two Piece with 3/8" & 1/2" Drive)
T30 Torx
8mm, 10mm Sockets
Shallow 12mm, 14mm Sockets - 3/8" Drive
Shallow 19mm (12 pt) Socket - 1/2" Drive (6 Pt is preferred, but 12 Pt made it easier to line up how I wanted it)
12mm, 14mm Wrench
5/16" ID Hose & Plug
10mm Long Arm Allen Wrench and/or 10mm Allen Stub Socket (May Need to Cut 1/4" - 1/2" Off End) - I used a Husky brand wrench Model # HLAHKM13PC from Home Depot and did not have to cut it
Pipe, Large Adjustable Wrench, Long Handled Pliers, etc (Something to Leverage Allen Wrench)
View attachment 59839
^^^Thanks for the pic PAX5
Process:
Remove Front Engine Cover
Unclip Power Steering Reservoir from Coolant Reservoir for Better Access
Pop Off Passenger Side of Rear Engine Cover
Remove Top Passenger Side Engine Cover by Removing Two T30 Screws

Disconnect 5/16" ID Coolant Line from Block - Plug Block (I would stuff a lot of shop towels under nipple before pulling coolant line.)
Disconnect Ground Strap with 12mm (or maybe 10mm)
Remove 8mm Bolt Holding Power Steering Line to Block
Remove 10mm Bolt Holding A/C Line to Frame (Optional: Helps when removing top idler pulley bolt)

Unclip A/C Line from Power Steering Line for Better Access
Remove 10mm Nut Holding Power Steering Line Bracket to Tensioner

Connect 19mm (or 3/4") Shallow Socket onto 1/2" Drive Section of Serpentine Belt Tool
Place 19mm Socket onto 19mm Stub of Tensioner
Connect 3/8" Drive Section of Serpentine Belt Tool to 1/2" Drive Section of Serpentine Belt Tool in Dog-Leg Arrangement (Keep in mind you want to generate a downward and maybe slightly rearward force on the tensioner - My 1/2" Drive section was nearly horizontal)

Slowly and Steadily Apply Pressure (Towards Front of XC) to Serpentine Belt Tool with your Right Hand - It does not require major muscle. Just steady pressure over the course of 45 - 60 seconds.
As the Tensioner Gives Way, use your Left Hand to Reach Serpentine Belt on Top Idler Pulley and Pull It Off - Release Tension Slowly

Now, Begin Removing Parts for Replacement:
Remove Top Idler Pulley and Engine Hoist Bracket (14mm) - Don't Lose the Washer from the Pulley
Remove Lower Idler Pulley (12mm) - Don't Lose the Washer from the Pulley
Remove Tensioner:
Place 10mm Allen Wrench into Tensioner Bolt (Keep the Arm Accessible for Applying Leverage)
Use Chosen Device to Leverage Allen Wrench Loosening Tensioner Bolt (Do NOT Slip Off Wrench and Do Damage)
Once Tensioner Bolt's Initial Hold is Loosed, then Begin Trying to Remove Bolt
I was able to slip the Allen wrench into the tensioner bolt by holding the wrench horizontally and wiggling it into the bolt. I could then get a quarter turn on the bolt and then finagle the wrench back out and repeat the process until you are able to remove the bolt by hand. It doesn't take many turns before you can remove it by hand. If you've cut the wrench, it may be easier to do this. I was able to do it without the cut. (User "sebvox" was able to use a 1/2" chunk of the Allen wrench and a ratcheting box wrench for this step. That might be easier!)
Remove Top Bolt Holding Tensioner to Block (12mm Open Wrench)
Remove Serpentine Belt (If the belt is annoying you along the way, you can completely remove the tensioner before the idlers.)
You should now have all of the parts removed from the block which you're planning to replace.
View attachment 59837
Re-installation:
I started by verifying that my new belt matched my old belt.
Route New Belt Around the Toothed Pulleys.
Install Tensioner
Install Idler Pulleys
Finalize & Verify Belt Routing Leaving Top Idler Pulley for Last
Remove Tension from Tensioner (Same Method as Above)
While Holding Back Tension, Slip Belt Over Top Idler Pulley
Slowly Release Tensioner
Verify Routing and Mating of Belt

Once ABSOLUTELY SURE Belt is Routed Correctly, Remove Tension from Tensioner and Remove Factory Installed Tension Holder from Tensioner with Pliers or Screwdriver
Replace and reinstall all other parts, bolts, and connections in reverse of sequence above.
Thanks to these posts:
https://forums.swedespeed.com/showt...ead.php?203185-V8-Serpentine-Belt-Replacement-Special-tool-needed-for-tensioner
https://forums.swedespeed.com/showt...hread.php?170139-Tutorial-XC90-V8-Replacing-the-alternator&p=1850806&viewfull=1
And on a personal note, thank you PAX5 very much for the technical guidance, support, and encouragement to keep going despite the ridiculous heat today.


