

I'll start at the beginning in case anyone else is interested in trying this.
My car would not take gas fast at all you basically had to trickle it in. Checked everything out found out the charcoal canister was bad while changing out charcoal canister decided to check the vapor canister. Air would not go through the vapor canister at all it was plugged up with the deteriorated charcoal. I checked local parts stores and my nearest dealer is about an hour and a half away and the part with shipping would have set me back about 300 bucks .
so...... I decided I would cut it open and see what makes it tick. ( Make a mark or two so it is easy to line back up when you put it back together. )
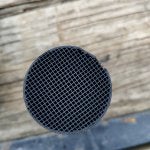
When I opened it up I found real fine grid work that reminded me of the honeycomb inside a catalytic converter. It was all full of dirty broken up charcoal that came through from the charcoal canister.
1 I removed all the grid work cleaned it out real well.
2 I found another piece of plastic pipe that I was able to fit snug inside of the vapor canister.
3 I cut it to length.
4 I then took some metal window screen cut it and secured it to one end of the pipe I cut.
5 For the next step I took some steel wool and loosely filled the tube so it was packed semi tight NOT packed in super firm.
6 Then I cut another piece of metal window screen secured it to the other end of the pipe.
7 I gave the entire pipe a wrap of heavy shop tape being sure not to cover the ends of the screen.
8Then I stuck the pipe inside of the vapor canister and slid the other end of the vapor canister on lining up my marks and pushing it tightly together.
9 I then plastic welded where I cut it open at. I checked to make sure it would hold pressure with no leaks.
So for about 45 minutes to an hour of my time I save probably $300 or more.
Hopefully some of you might find this useful and helpful.
My car would not take gas fast at all you basically had to trickle it in. Checked everything out found out the charcoal canister was bad while changing out charcoal canister decided to check the vapor canister. Air would not go through the vapor canister at all it was plugged up with the deteriorated charcoal. I checked local parts stores and my nearest dealer is about an hour and a half away and the part with shipping would have set me back about 300 bucks .
so...... I decided I would cut it open and see what makes it tick. ( Make a mark or two so it is easy to line back up when you put it back together. )
When I opened it up I found real fine grid work that reminded me of the honeycomb inside a catalytic converter. It was all full of dirty broken up charcoal that came through from the charcoal canister.
1 I removed all the grid work cleaned it out real well.
2 I found another piece of plastic pipe that I was able to fit snug inside of the vapor canister.
3 I cut it to length.
4 I then took some metal window screen cut it and secured it to one end of the pipe I cut.
5 For the next step I took some steel wool and loosely filled the tube so it was packed semi tight NOT packed in super firm.
6 Then I cut another piece of metal window screen secured it to the other end of the pipe.
7 I gave the entire pipe a wrap of heavy shop tape being sure not to cover the ends of the screen.
8Then I stuck the pipe inside of the vapor canister and slid the other end of the vapor canister on lining up my marks and pushing it tightly together.
9 I then plastic welded where I cut it open at. I checked to make sure it would hold pressure with no leaks.
So for about 45 minutes to an hour of my time I save probably $300 or more.
Hopefully some of you might find this useful and helpful.


")


