SwedeSpeed - Volvo Performance Forum banner

MikeJr's 1967 122 Project

26K views 40 replies 12 participants last post by  nogirlsatgt  
#1 · (Edited)
Here is my 67 122. I have had this car since 04. I copy and pasted most of this from my build thread on turbobricks, so sorry if it reads a little weird in places. Here is a link to all the pictures from the project http://www.pbase.com/mikejr/67_122_project

Image


Image


Image


I have always loved the 122s. They are my favorite Volvo model. I have wanted one for a very long time. I have had a few of them but they were part cars. I have never owned one that you could actually drive. I thought about buying one that was already restored, but I tried that with a 62 P1800. It looked great but it was a lemon.

Image


It had been badly restored. So I wanted a 122 that I could restore myself. So I knew exactly what was done to the car from the ground up, and I could do it the way I wanted.

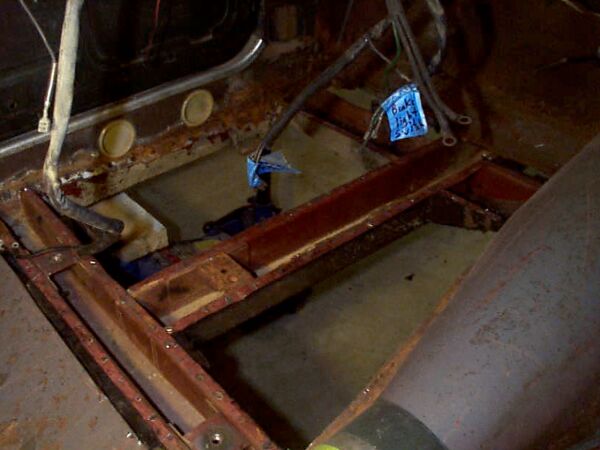
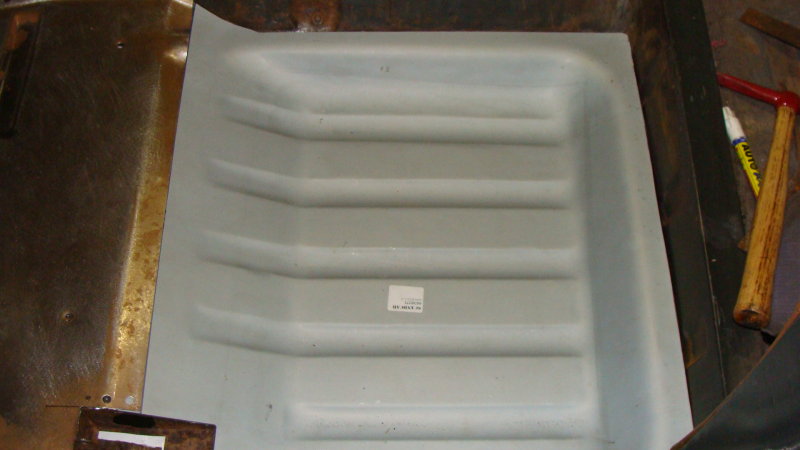
I found the car on eBay in Boca Raton FL. Shipped it cost me around $500.00. The body as a whole is in good shape. It does need floor pans and some other patch panels, but that is an easy fix. One neat thing about the car is that it hadn't been a running car for about 6 years. When I got it I put a new battery in it and a little gas, and after about 3 minutes of tring to crank it it started right up. The idle was great and it stayed running. I was amazed.

I will be documenting the restoration and will be asking for some suggestions about certain aspects of the project. Stay tuned. There's more to come.
http://www.pbase.com/mikejr/67_122_project&page=1

MikeJr.
 
#2 ·
I pulled the motor and cut out the old floor pans. This is the original b18 that came out of the car.

Image


Image


Image


All painted and ready to go right? Wrong! I got my hand on a 122 rally car. It had a bored over b18 with a fuel inj. head, stahl header, street performance cam, weber. Also it had a full ipd suspension with HD bilsteins. Here is the motor

Image


Here are some of the pics of the floor pan. They were rusted from the inside out due to bad weather striping. Water had been standing in the pans for who knows how long.

Image


Image


Image


Image


Image


Image


Image


Image


Cutting out the cancer.

Image


Image


Image


Image


I bought the new floor pans from http://www.scandcar.com/
 
#8 ·
Worked on the body a little today. Fabbed up the right hand inner rocker panel patch. I had to reuse the jack mount from the old panel but it wasn't in to bad of shape.
Image

Image

Image


I also used POR-15 on the right side frame rails before welding the new pans in. I did this on the left side too, but I forgot to take pics.
Image

Image


and on some fabbed up parts
Image


Also fitted my short shifter tranny tunnel...
Image


so I can install this
Image


but first I have to do this
Image


And what's this?
Image

Image

Image


and last but not least I traced out and drilled parts for the motor mount brackets
Image
 
#9 · (Edited)
Did a little 8.8 work. I shortened the long side to match the short side length.
Image

Image

Image

Image

Image

Image

Image


I got the angle right cause the axles match up perfectly
Image


Test fit not so good. The stock control arms push the rear end to far back. It's due to the axle tubes on the 8.8 being double the diameter of the stock rear end. Also even with the lowering coils the car sits higher than stock ride height for the same reason. I'll have to do something different.
Image

Image


I also test fit a 17x7.5 Ford Police Intercepter wheel with a 215/45R17 dunlop on it.

Image
 
#10 · (Edited)
Decided on adjustible rods and hotrod type coilovers for the rear. That way I can put the rear end where ever I want it.
Image

Image

Image


8.8 Install pics. The adjustable arms are going to work perfectly. There is so much adjustability now. I made the arms with a left hand on one end and a right hand on the other, that way all you have to do is twist the arm in or out to make it longer or shorter. Don't judge the welds :p It's just tacked together while I fit everything.
Image

Image

Image


That Shiny thing sticking out of that bracket is where I plan to mount the coilover
Image

Image


Where and how I plan to mount the panhard rod
Image

Image

Image

Image

Image

Image

Image
 
#13 ·
Nice rebuild. Too bad that a car from Florida got so much rust. Unless of course, the car came from the north ...

You may want to get a set of SU carbs for this well built engine. If you have a high revving engine, you may want to get a set of 4.56 gears for it for full racing performance, at the expense of freeway driving (unless of course you get an OD for it!).

Those wheels and tires may be too much for it. These cars are light, they don't need so much rubber.

I like the color too. The metallic colors nicely fit these cars.
 
#14 ·
It actually rusted from the inside out due to leaky wheatherstrips. The underside of the floor pans had zero rust. It will have a 4:10 with a limited slip in the 8.8. I hope to make enough power with the engine to make quick work of the wide tires. Also I plan to paint it a more solid color like black, red, or white.
 
#16 ·
Mike, I know that these tires look "hot" and consistent with latest automotive fashion. But those cars handle very well with stock size or slightly larger tires. My ipd car has 4.5" wagon wheels and 165 tires, and still corners extremely well. I am sure it would do a bit better with more rubber. But I think that you will definitely be well into the "diminishing returns" range with these huge tires.

The actual benefit of the super low profile characteristic is not so much for handling. Cornering force is not too sensitive to the section height. The lower profile tires only reduce slip angle needed for the same cornering force, but also make adhesion loss more sudden. These tires were developed for fitting huge wheels (necessary for huge brake rotors) and still low and tight wheel wells of modern aerodynamic cars. You may have lot's of downsides for such huge tires, which can be steering difficulties, accelerated ball joint wear etc. In fact, the ipd set up needs a small steering wheel for rapid steering correctings when driving fast, and that it might be tough with such large tires. Finally, the actual torque you will transmit to the tires is limited by the 4.10 rear. Even cars with 4.56 or 4.88 are happy with much smaller tires.

May be you should start with smaller tires first, and if you don't like them try larger. I think that the optimum tires size for an ipd Amazon is about 185-65 to 195-65 (certainly no larger than 205) on a 15x6 or 15x5.5 wheel. My stock Amazon seems happy with the 185-65 on the stock 4" wheels. Still corners well, but lacks the response and high lateral g's that my ipd does (despite smaller tires).

One day, I will upgrade my ipd Amazon to larger tire sizes. For now, the 165's are still a bunch of fun.
 
#17 ·
Here is how I cupped the front lower control arms.
Image

Image


This is not my picture. I forgot to take one during the process, but this is how I did mine and where I got the idea from
Image


Here is mine after I welded it up. I extended it down 2"
Image

Image

Image

Image

Image

Image


And here is how I did the panhard rod.
Image

Image

Image

Image

Image

Image


Front suspension is apart. Time for powdercoating.
Image
 
#18 ·
Looking good man, I've thought about cupping the a-arms like that, and then using a coilover adjuster pad for fine tuning ride height, but the lazy man in me just uses lowering coils, or cut coils when I'm feeling cheap. I just got all my stuff powdercoated and they did a good job masking all the threaded holes, but they didn't mask my tapered hole in the steering link, so I gotta clean that out. You might want to mention it when you drop them off.
 
#19 · (Edited)
Cool! Thanks for the powdercoating tip. I was thinking of doing a coilover type for the front but I too am cheap and will see how this set up work first. I'm using TME lowing coils in the front with the 2" cup so it should be pretty low.

I like your build BTW. I am following it closely.
 
#20 ·
Cool stuff man. I'm doing something similar with my 1800S, narrowing an 8.8 rearend. I narrowed mine by pressing the tube out, cutting it and rewelding it though. I'm more shade-tree like than "use a $500 axle shortening kit" and thought it would help keep things in line better. If anyone else wants to go this route, keep in mind you'll need a very tall, very heavy press to get the tube back in, something like a 100 ton.

What kind of coilover units are you using?
 
#26 ·
I decided to do some work on the motor and transmission mounts for the b230 and T5. I installed the old b18 and m40 with new motor/trans mounts to determine where the motor sat in the car, stock.

The b18/m40 sit a about a 4 degree tilt backwards, or "down" at the rear.
Image

Image

Image

Image


I wanted to make some kind of jig for the b18 to determine where it sits in the engine bay. I figured that one of the main things that the b18 and the b230 share is the oil pan bolt pattern, and their oil pans are interchangeable, so I decided to build off of the front two bolt holes on the b18 oil pan. Here is what I came up with.

Image

Image

Image


It looks like this jig bracket is supporting the motor, but it is only there to give me a point of reference for the oil pan bolts, which will give me the center point and the height of the b18 in relation to the crossmember.

Image

Image

Image


I also decided cut up the floor pans that I just installed. I cut the tunnel out to make room for the 8.8 and the mustang drive shaft.

Image

Image

Image

Image

Image


I plan on installing some kind of drive shaft loop or loops.
I got a 2004 mustang drive shaft and kind of set it up there to get some very rough measurements. I couldn't install it yet because the slip yoke on the 04 drive shaft doesn't match up to the tail shaft of the 93 T5, and the rear pinion flange from the 00 explorer doesn't fit the 04 mustang flange. A little error on my part, but I just needed something to at least give me some idea what I was working with.
Image

Image

Image

Image

Image


The very good news is that the length of the stock 04 mustang drive shaft looks like it will work without modification, which means I may be able to use some kind of off-the-shelf aluminum driveshaft.
I'm going to take the drive shaft to the custom drive shaft shop and talk to them about how they think I should set it all up.