

So I'm sure several people read my thread about that nasty scratch on my passenger door. Whether it came from a cart, key, etc, I made the decision to get a new Dash Camera. Next time, if it was some idiot keying my car, they'll be on video. Or I can see what exactly happened.
https://www.amazon.com/Channel-Camera-Hardwiring-Installation-Included/dp/B07HMBV3H3/ref=sr_1_3_a_it?s=beauty&ie=UTF8&qid=1546981725&sr=8-3&keywords=viofo+a129+duo
1. I ordered the camera Above. A Voifo A129 Duo that comes with the hardwiring kit.
2. I ordered the suction mounts below. Camera mounts with 3M adhesive. A Big No No since my windows tinted. So I'll have suction cup mounts instead.
https://www.amazon.com/gp/product/B000FGI9R0/ref=oh_aui_detailpage_o01_s00?ie=UTF8&psc=1
So the Big Questions
I'm nervous on the install and have tried to watch videos, but they aren't either Volvo Specific or are for European Volvos that don't match up to MY 15.5.
My Car is an American 2015.5 Volvo S60 T5 FWD
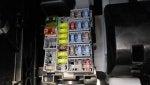
A. My question, WHAT Fuse do I use to hardwire the Camera to allow it to run off a constant supply of power WITHOUT interfering with the electrical systems. If you look at the Camera Link above, it comes with a hardwiring kit where you plug in BOTH fuses to the adapter? Please see below for an image of the Fuse Box sitting under the Front Passenger Side glove box.
![]()
B. What is the best way to route the wires? Anyone mind uploading a "How To". I can't find a good video for a Volvo. I know the hardwiring kit has to terminate at the fuse box (what route do people take).
And then what about the rear camera cables? What route do I take for those without interfering with the airbags?
I'd really appreciate some guidance and pictures. I'm trying to determine if this is a DIY project or better to pay a professional.
https://www.amazon.com/Channel-Camera-Hardwiring-Installation-Included/dp/B07HMBV3H3/ref=sr_1_3_a_it?s=beauty&ie=UTF8&qid=1546981725&sr=8-3&keywords=viofo+a129+duo
1. I ordered the camera Above. A Voifo A129 Duo that comes with the hardwiring kit.
2. I ordered the suction mounts below. Camera mounts with 3M adhesive. A Big No No since my windows tinted. So I'll have suction cup mounts instead.
https://www.amazon.com/gp/product/B000FGI9R0/ref=oh_aui_detailpage_o01_s00?ie=UTF8&psc=1
So the Big Questions
I'm nervous on the install and have tried to watch videos, but they aren't either Volvo Specific or are for European Volvos that don't match up to MY 15.5.
My Car is an American 2015.5 Volvo S60 T5 FWD
A. My question, WHAT Fuse do I use to hardwire the Camera to allow it to run off a constant supply of power WITHOUT interfering with the electrical systems. If you look at the Camera Link above, it comes with a hardwiring kit where you plug in BOTH fuses to the adapter? Please see below for an image of the Fuse Box sitting under the Front Passenger Side glove box.
B. What is the best way to route the wires? Anyone mind uploading a "How To". I can't find a good video for a Volvo. I know the hardwiring kit has to terminate at the fuse box (what route do people take).
And then what about the rear camera cables? What route do I take for those without interfering with the airbags?
I'd really appreciate some guidance and pictures. I'm trying to determine if this is a DIY project or better to pay a professional.


