SwedeSpeed - Volvo Performance Forum banner

ES Window Crank removal

1 reading
8.1K views 13 replies 8 participants last post by  pzvt  
#1 · (Edited)
I figured I should post this little exercise in case others were baffled by this bit of Swedish ingenuity. As far as I could find, this is isolated to the ES window winder assembly and possibly later model coupes.

I needed to remove my door panel for body repair (see Resto-Mod post). I knew there was an "omega" clip retaining the winder handle, but I could not see it. Just happened upon comments on another forum about a special tool needed to fish the clip out from behind a metal "cup".

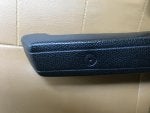
In the pic, you can see the plastic trim ring and the metal cup. The clip was between those two. There is a foam donut around the shaft which pushes out on that cup, forcing it into the plastic trim ring and essentially locking the clip behind it.

I created two tools for removal, once I understood the system. The flat piece of 18ga metal has an offset hook to pry behind the cup lip, pulling it back into the foam donut. The thin 26ga metal strip with a hook on it was used to snag the clip at the same time and yank it out.

Now I know why the plastic trim ring on the other side is missing. Someone accessed the clip by busting the trim piece. Anyone have a spare plastic trim ring?

John
 
#2 ·
If the above description and tool assortment is confusing, here are the pieces looking from the back side. Just remember there is a door panel sandwiched in between the plastic trim ring and the metal cup! Thats the reason for the offset in the wide sheet metal tool. Also there is a foam donut, mounted to the steel door inner face, pushing the metal cup out. Hope this helps.

 
#3 ·
A guy I used to work for called these "Jesus Clips" because His name was often uttered when working on this. :rolleyes:

To remove the handles, you're supposed to push the door panel and trim ring inwards to expose the clip (there should be a conical spring behind), then use a tool much like the one you made to pull the clip out of the slot. The handle comes away once you do that.

To put them back on, just put the clip into the slot, place the handle on the post at the angle you want, and give it a tunk with your loose fist.

Like most body trim work, it's really not too hard to deal with these once you get the hang of it.
 
#4 ·
That is how the other forums mentioned doing it, and must be common on most 1800 models. Until someone mentioned having to reach up behind the panel to pull pieces of foam out to get enough room to reach the clip. Then, when they did, they realized the clip was captured BETWEEN the plastic ring and the steel cup. You can see that the plastic trim ring cannot push past the clip, therefore the need to compress the metal cup back toward the foam "spring" away from the panel back. That's where that flat tool came in. It grabs the edge of the cup and allows enough leverage to expose the clip.


#6 ·
Thanks Phil - I think I can visualize your description. Just a matter of discovering the open end of the clip, and sliding it across.

However, that dang foam "spring" has hardened over the years and does not allow much inward movement. Once I had the cup edge exposed, I was having to pry with screwdrivers to reach the clip.

I should have posted the query, but strange there was such a lack of instruction online.
 
#7 ·
Reviving this thread with an entirely lame question, but at the same time motivated by the newly acquired 'free time' at home to undertake some long overdue ES projects. April's projects will entail replacing the interior board/door panels and a broken door handle among a few other things. While I am clear on the stated process for removing the door handles, window cranks door handles, panels AND armrests, I am wondering as to what to expect when removing the black plugs to access the screws that bolt the armrest to the door. In short, I am paranoid of cracking the 48 year old plastic arm rests and/or damaging the plugs in any way, so my question is - what is the best way to remove them?? I note they have hole in the centre - is it best to use a pick to pop them out from the centre or a small screwdriver to go in from the side?? Do they require a lot of force to remove? Again, I accept the lameness of the query, but am also aware that they aren't making new ones anymore, so if I screw these up..... Any/all insights are welcomed. Stay safe everyone!
 
#8 ·
On my 140, the plugs in the armrests are about 12-15 mm in diameter with a hole in the center. Are we talking the same thing? If so, low risk of damage. They are more of a vinyl rather than a hard plastic and up until a couple of years ago had been popped out a number of times without damage. I used a tool like a seal pick (90 deg bend on the end) inserted into the hole and pull out with a little wiggling. The small screwdriver from the side in addition to the pick may help if they are sticky; but, you risk marring the vinyl around the edges so do it as a last resort. If 30+ years ago a previous owner had gone overboard repeatedly spraying Armour All to make the vinyl shiny you can have a build up which tends to glue stuff in place. In that case running the shaft of a tiny screwdriver around the periphery of the plug may help to break the plug free. Some silicone lube sprayed around the periphery of the plug will help things go smoothly on removal and reinsertion.

While my plugs came out without any material damage, the black plastic clips that hold the door card on to the inner door skin did not fair so well. If they are the same part as on the 140 you should plan to have replacements on hand. In fact, if they are like the ones on the 140 I would have a complete set for each door on hand. They are available individually; but, they are silly expensive for what they are. If you get the part number and search on-line you can get aftermarket equivalents in bulk packages of 40 or 50. Still pricey; but, not as bad. Good to have lots because I managed to break some of the new ones on reinstallation if you don't line the clip up exactly with the hole in the door skin when you whack the door card back into place with a rubber mallet. They are not a particularly robust design.
 
#9 ·
Thx 142 - see attached image. They do have a centre hole and I have a 90 degree pick. I am going to warm up the surrounding area with a bit of heat to make things a tad more pliable, then work carefully. Thx for the tip on the door panel clips - Vintage Auto has a pack of 50 for around $35, so I will go this route. Typically I order my stuff from the US/Europe and pick up in Washington, but with the travel ban, I am limited to local suppliers, as apparently vintage Volvo parts are not considered essential - WTH?? I will update accordingly and will take some pics in the event someone else needs some insights.
 

Attachments

#10 ·
That plug appears to be identical to the plug on my 140. Being from Coquitlam you really don't know what an un-heated garage means :); but, warming up the plug and the arm rest to make the material more flexible is a good idea. I generally wait until outside ambients are above 10 C before doing interior work on plastic stuff. If you are picking up 50 of the clips for $35 Cdn, you probably are not going to do much better than that price-wise.
 
#11 ·
To follow-up and for reference, I warmed the area around the plugs and used a 90 degree pick to carefully work out the plugs. You can see by the attached photo that they are about 1/2 inch deep and well-anchored into the actual armrest body, but they do come out cleanly. To add to the job jar, my driver's door handle is missing all three of its 'teeth', which means I will be adding this item to my purchase list. All good!
 

Attachments

#12 ·
So I followed all y’all’s tips. Thanks btw. It still wouldn’t come off. I took a bic lighter and heated up the window crank as evenly as I could. Thankfully Volvo built a pretty good car and the crank is real metal. It came off very easily after being heated. It was effectively corroded to the post. We even had a slide hammer, gently pulling at it prior to my heat trick. I think I’m going to put it back on and dab abit of glue and forgo the omega clip. Sorry guys, but that clip made me angry on the inside.
 
#13 ·
@4runner Please do the next owner of your vehicle a favor and put the window crank back on with the omega clip, as shown by Phil Singher in his earlier post. You haven't seen a Jesus clip until you've tried to remove the corresponding part from a P1800/1800S. The E/ES omega clip pops off in your hand if you follow Phil's advice, and there is absolutely zero need to improve on Volvo's engineering. Best, Duncan. [ES owner since 1972, with a few years gap, now back in the fold with ChNo 828, currently working through the prior owners' "engineering improvements"...]