I recently changed my timing belt on my S40 and wanted to do a write up for everyone after all of the help that I got. Special thanks to Shadowlord for the original walk through that I used as a reference. I wanted to make this write up as a supplement to his for guys like me who are newbs and have a ton of questions. Thanks to everyone else who answered my questions along the way.
The whole job took me about a week:facepalm: but 2 days of that were spent playing starcraft 2, and another 2 days were spent getting tools and waiting for a gasket that I broke. I feel pretty confident that I could do this in a day if I were to do it again. I am not a mechanic, in fact this was also the first time I changed spark plugs or have done anything this complicated but I was an electrician before going back to school so I know my way around tools.
Feel free to make any corrections at the end if you see something that was wrong or could have been done easier.
Break the lug nuts so that they are easy to remove and then jack up the car safely and place it on jack stands, making sure to chock the wheels.
Start by following this guide to remove the spark plugs. This is not necessary but it makes it much easier to rotate the engine and line up timing marks as you are not fighting against compression.
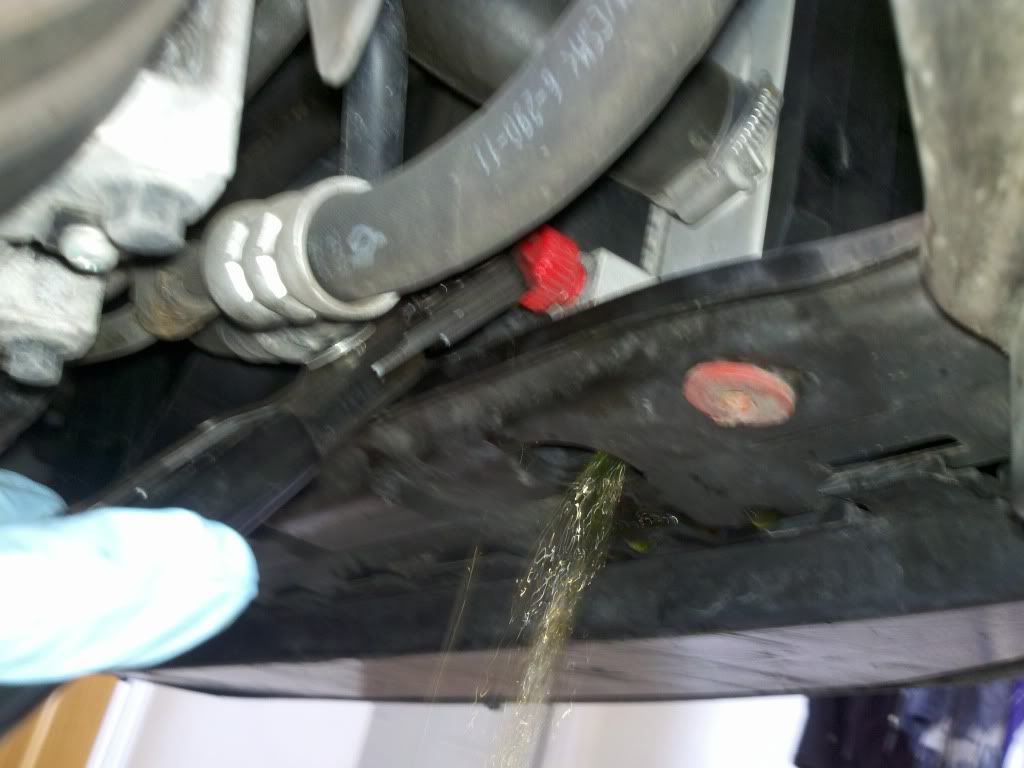
If you are changing the water pump as well, drain the coolant. This is done by loosening the red spigot at the bottom of the radiator. Remove the water pump reservoir by pulling straight up and zip tie it out of the way.
![Image]()
Remove the wheel and the inner liner. It consists of 3 pieces and requires torx and 10mm nuts.
(I had to remove these pictures because you can only have 30 per post, this is really straight foreward though)
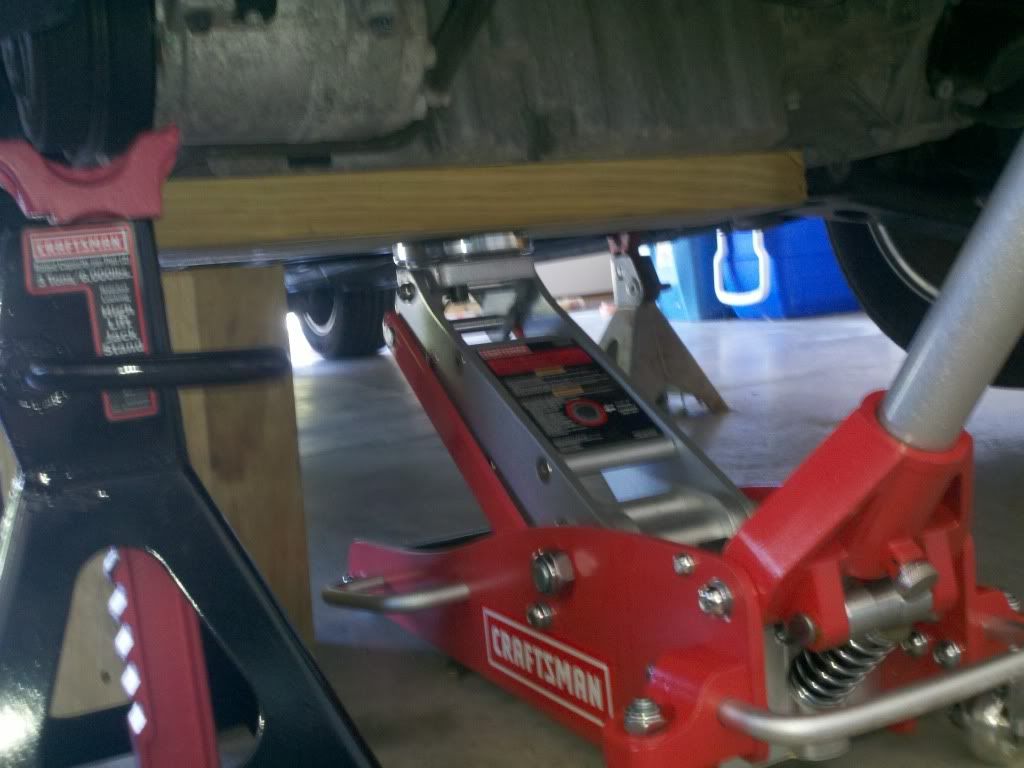
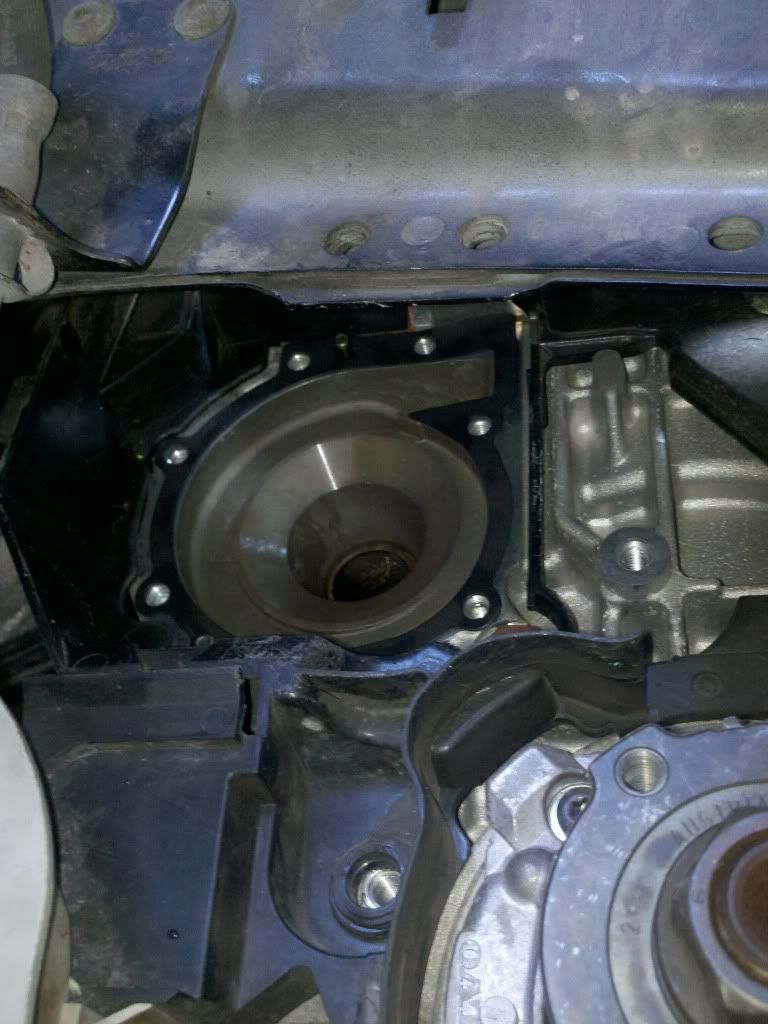
Break free the four bolts holding the passanger side motor mount so they are easy to remove. Next place a hydraulic jack under the engine with a 2x4 or larger to displace the weight across the oil pan. I also made a T block out of extra wood just in case the jack failed or lowered without me noticing. Put enough pressure on the jack to hold it up, but dont force it as the motor is still attached by the motor mounts.
![Image]()
Remove the two bolts holding the engine to the shock tower. With these removed you can jack the motor up a few more pumps until it is suspended a few cm over in the air. Once suspended finish removing the motor mount. This gives clear access to the rest of the timing belt covers.
![Image]()
Here is the bolt for the lower timing belt cover that can be accessed after removing the motor mount.
-again photo removed to get to limit, if you cant find this bolt put everything back together and take it to someone who can")
Next remove the belt that goes from crank pulley to the ac compressor. This is done by using a T50 (if i remember right) torx and rotating the tensioner clockwise. It is kind of a pain to get the belt off but possible. A larger ratchet makes this easier. I decided to replace both belts while I had everything apart. I paid 100 for these at a dealership but they are about half that online. (Lesson Learned!). I also forgot to take a picture of the second belt removal process because I accidently used a T45 and stripped out the torx slot in the alternator tensioner, but I used a hammer and tapped the T50 into place enough to get that belt changed.
![Image]()
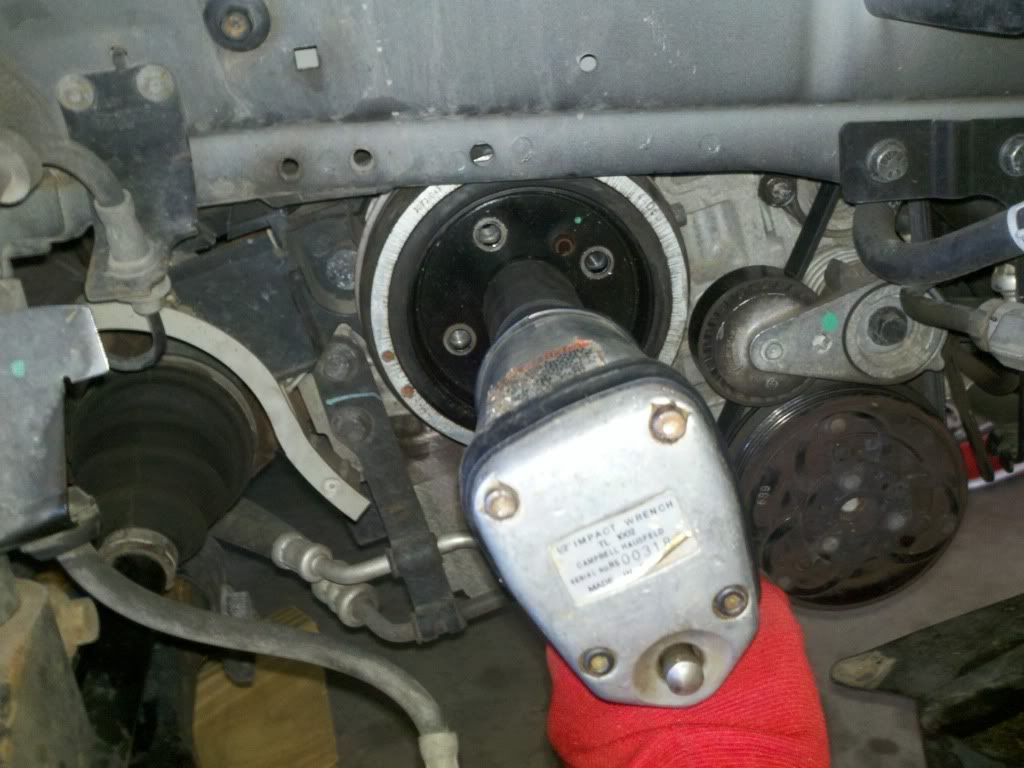
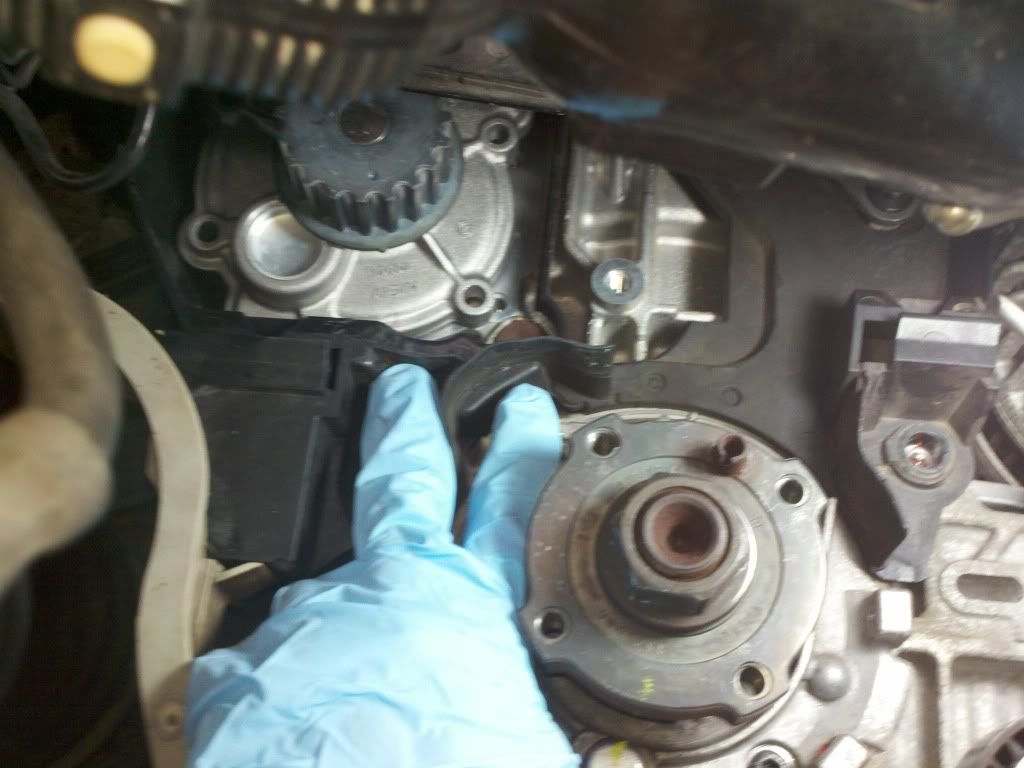
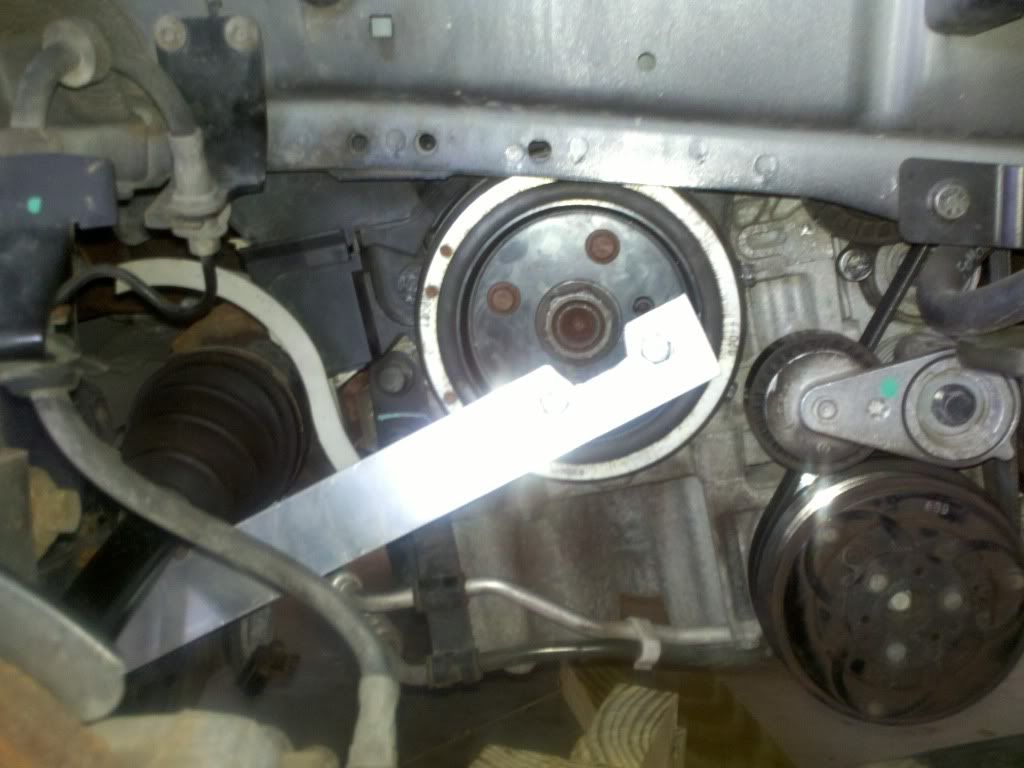
With the belts removed it is now time to remove the harmonic balancer. This is done by removing the 30 mm large center nut and four 10mm nuts around it. I was lucky to have a friend with a large compressor and an impact gun. Even with that it took a few hits with the gun to get it broken free.
![Image]()
With the large nut and 4 bolts removed now you have to get the pulley off. The spot that seemed to stick on mine was the alignment post, seen in the previous picture as a rusty circle at the 1 o-clock position. Make sure to spray this with some JB weld as soon as possible. A dead blow hammer will also help. I rented a harmonic balancer puller kit from auto zone, but this is probably the wrong method of removal because it actually pulled the crank sprocket off of its splines by about a 1/4 inch requiring me to hit it back into place with a dead blow hammer. I would refer to the original guide's method of removal.
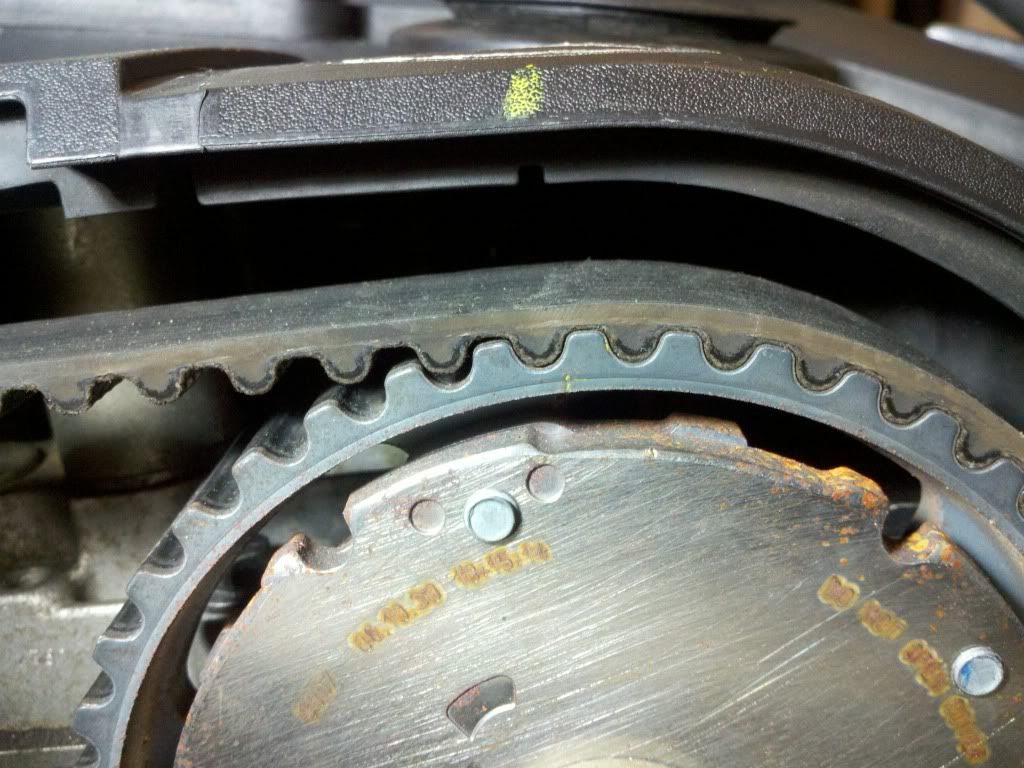
With the balancer pulley removed, you can put the 30mm nut back on and use this to rotate the engine until all three timing marks are lined up. I was unsure of my upper marks at first thinking they were possibly a tooth off, but after locating the bottom mark and lining it up perfectly the upper marks looked dead on. I used a large roofing crayon to make the upper marks easier to see.
On the cam sprocket, the raised bump on the outer surface lines up with the raised boss on the oil pump. The upper marks are small lines cut in to the face of the cam sprockets, and these line up with notches in the plastic upper cover of the timing belt. Make sure this plastic cover is perfectly in place before trying to line up the marks. As said eairler, I lined up the bottom mark first then check the top two to see how they looked.
Crank pulley shown with red arrows pointing to alignment marks that are correctly alligned.
![Image]()
Top cam pulley's with allignment marks that are correctly alligned. As you can see they are not 100% dead on, but you are lining them up with a piece of plastic...
![Image]()
![Image]()
The left cam is hard to see with everything in the way, I made an additional mark on the top of the plastic cover and could then see by looking straight down that they were aligned.
![Image]()
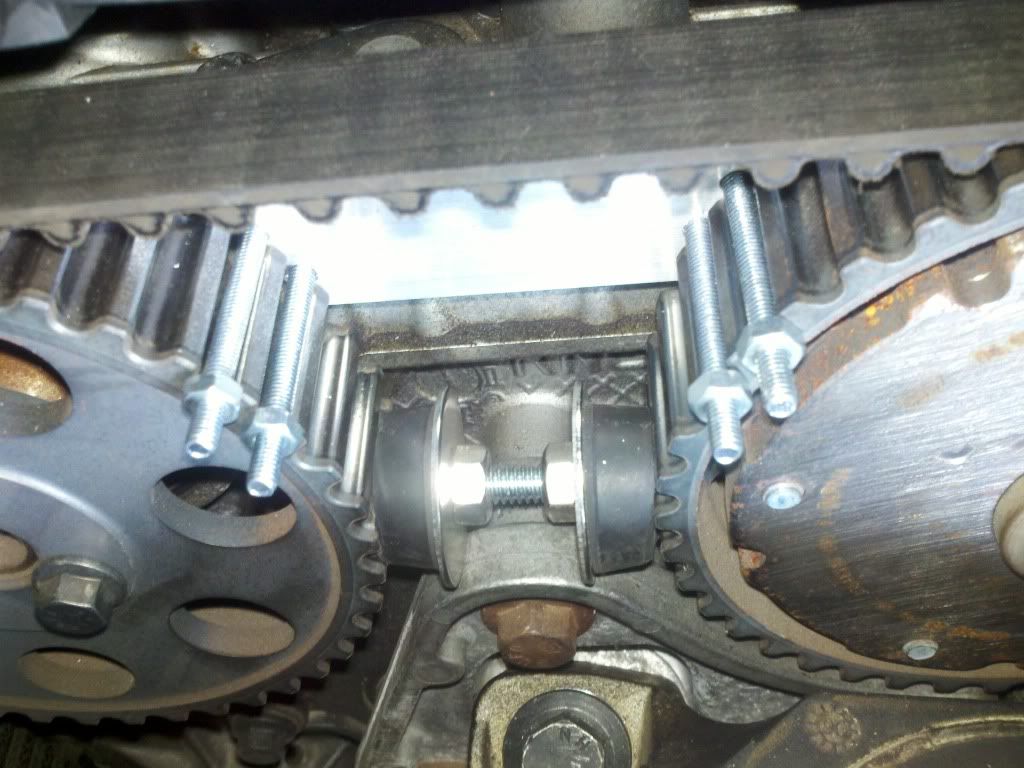
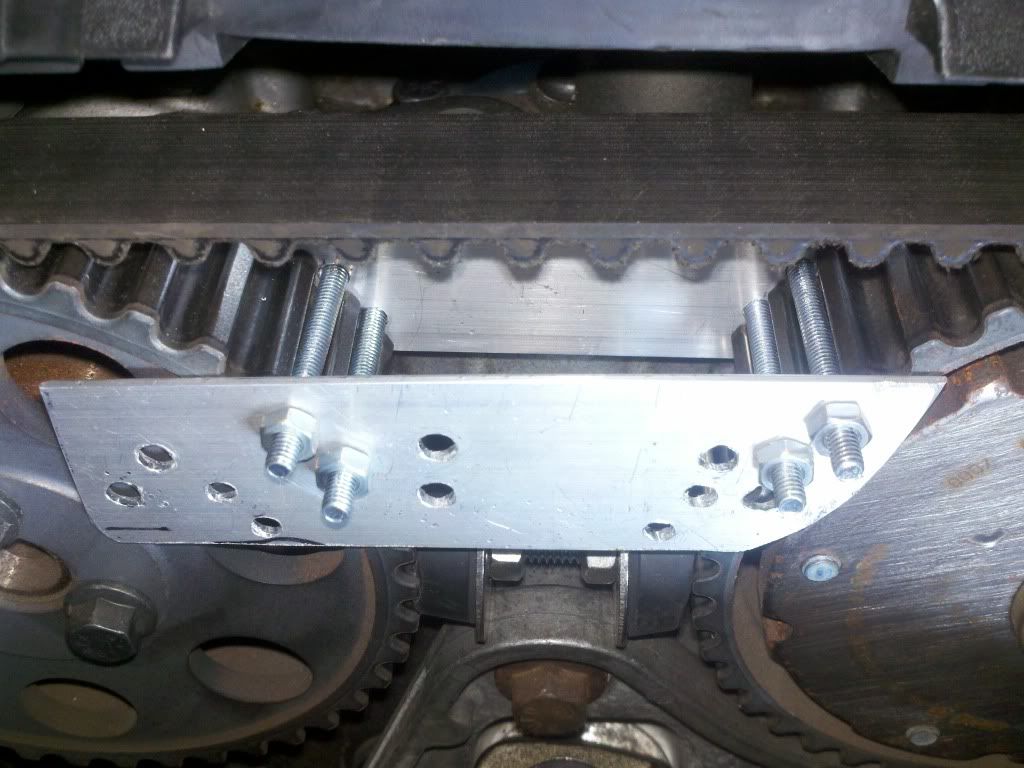
Before removing the timing belt, I decided to make a cam-shaft holding tool rather than purchasing one. You could go either way. It is not necessary to do this, but I would really recommend it because once locked in place you dont have to worry about them moving. Also, the new belt is a pain to get on so with the cams locked you can actually use them for leverage when trying to get the new belt back on. I used two methods of locking it in place. The first is simply a threaded rod cut to fit between the gears. I then got two rubber stoppers and cut them to fit. I drilled a hole in the rubber stoppers so that they would fit over the threaded rod and then slid two nuts with washers to push the rubber stoppers outwards against the cams. The second was two pieces of aluminum and four nuts and bolts. I took one piece of aluminum, held it against the cams, and marked where the indents of the teeth were. I then drilled holes so that the bolts would sit in the groves and prevent it from rotating. It worked really good. As you can see it took me a few tries to get the holes how I wanted them.
![Image]()
![Image]()
Before removing the belt, I made a few extra marks on the cams and crank and engine block so that I was sure nothing moved during the process. I forgot to take pictures of these. I also made marks of which teeth went in certain spots and transferred these to the new belt. This made me more sure that I was putting the new one on correctly.
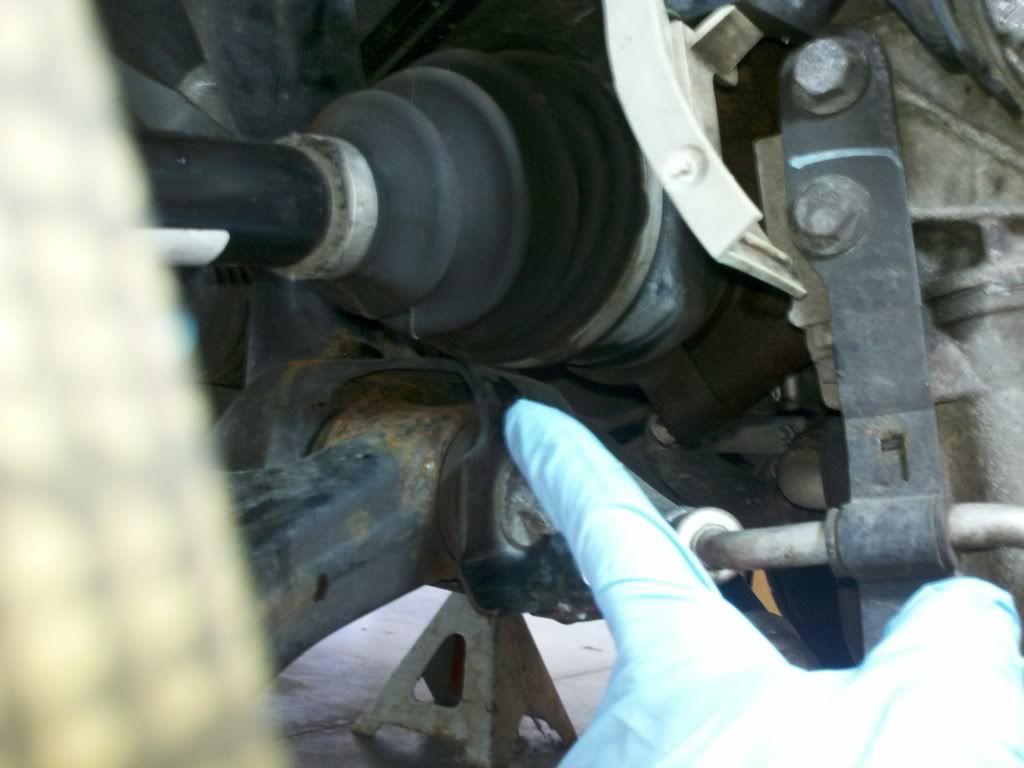
To get to the belt tensioner it is easier to lower the engine first. Be careful that you dont lower it too much. The first pinch point I could see was the drive axel on the control arm. ( I think that is what they are called.) I was able to lower my engine until these almost touched. I also cut a notch in my wooden T block to allow for lowering. Before lowering you will notice about a 1 or 2 inch gap between the axle and control arm, here is what it looks like after lowering.
After Lowering.
![Image]()
You can now reach the tensioner. Insert a 6mm allen key into the slot and loosen the tension. Mine broke when I did this so I either rotated it the wrong way or It was going to break anyways so Im glad I'm changing it. For some reason my picture of this did not come out. With the belt off you can now replace the water pump (if you want to), tensioner, and idler pulley. The idler pulley is eaiser to remove with the engine raised up to its top position. While you have the engine up, also break free the few top bolts on the water pump. I bought a 1/4 in socket wrench with a pivoting head and it worked perfectly for this.
![Image]()
![Image]()
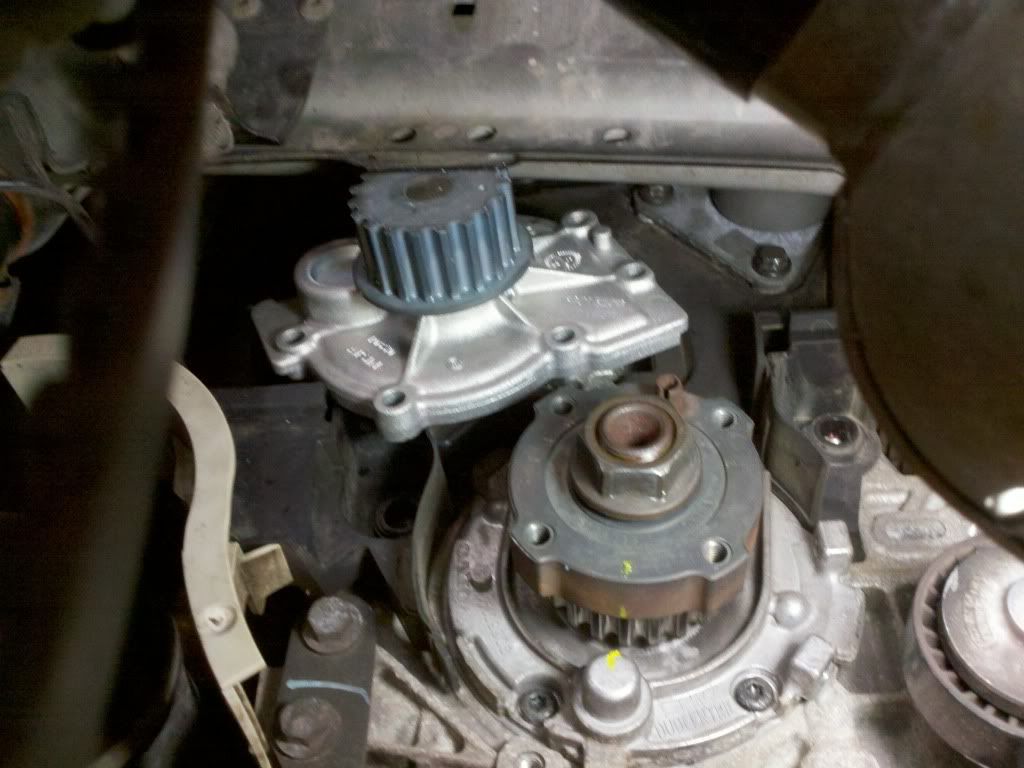
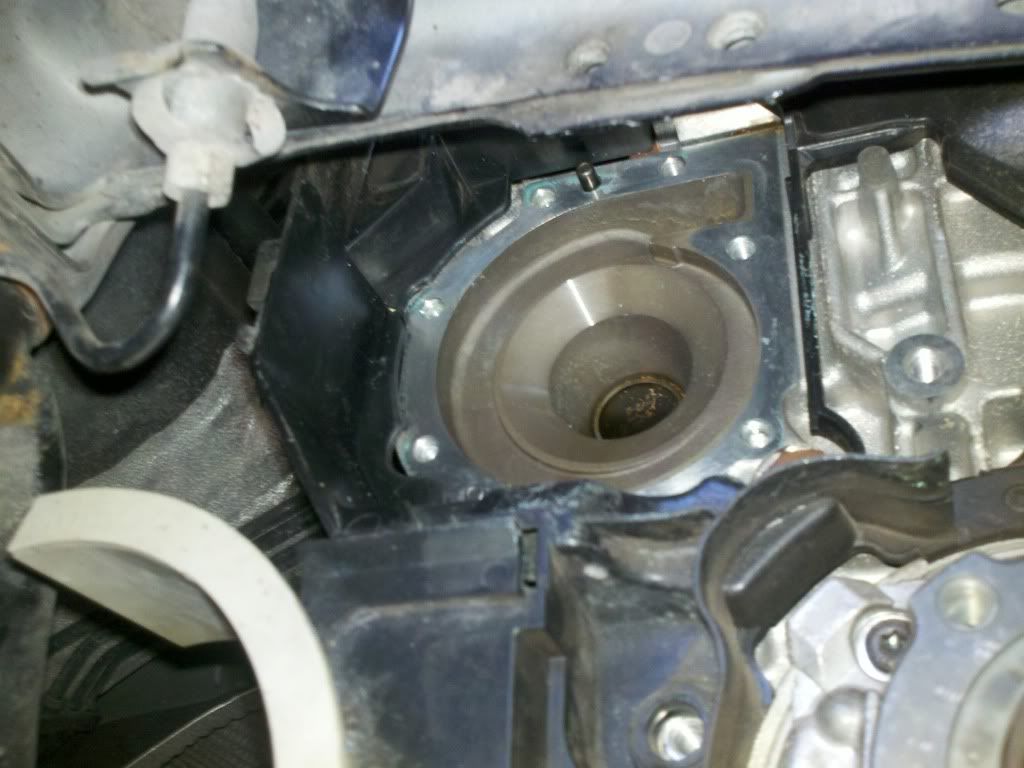
With the idler changed and top bolts of water pump broken, Lower the engine for better access and finish removing the water pump and old tensioner. The tensioner only has 1 bolt. When replacing this only tighten it hand tight. Getting the water pump out is a pain, but it does fit. Make sure to clean all of the old gasket off of the block. I used water and an abrasive pad. Make sure to have a small bucket handy as some coolant will drain out of the water pump.
![Image]()
![Image]()
![Image]()
![Image]()
![Image]()
I tried to install the new water pump by gluing the new gasket to the back and installing it but it is such a tight fit that it ripped in the process! You can see in the last picture a placement pin that the the water pump slides on, there is another one at the bottom. My trick in getting the new pump and gasket on was to wet the gasket and block with water so that the gasket will somewhat stick in place to the block. Set it in place over the locating pins and just be careful that it didn't move when you finally get the new pump in place. I slowly inserted each bolt to make sure that the holes were still lined up. This may take a few tries. Notice that there is two slots that are rubber on the timing belt guard that you can use in getting the new pump in and out, I am pointing to these.
![Image]()
![Image]()
![Image]()
The bolts on the water pump are rated for 7ft lbs and 10NM. I could only get a torque wrench on the bottom bolts but I used this to make a best guess for the rest of the bolts. Make sure to tighten it in a star pattern to ensure that it sits flatly on the block.
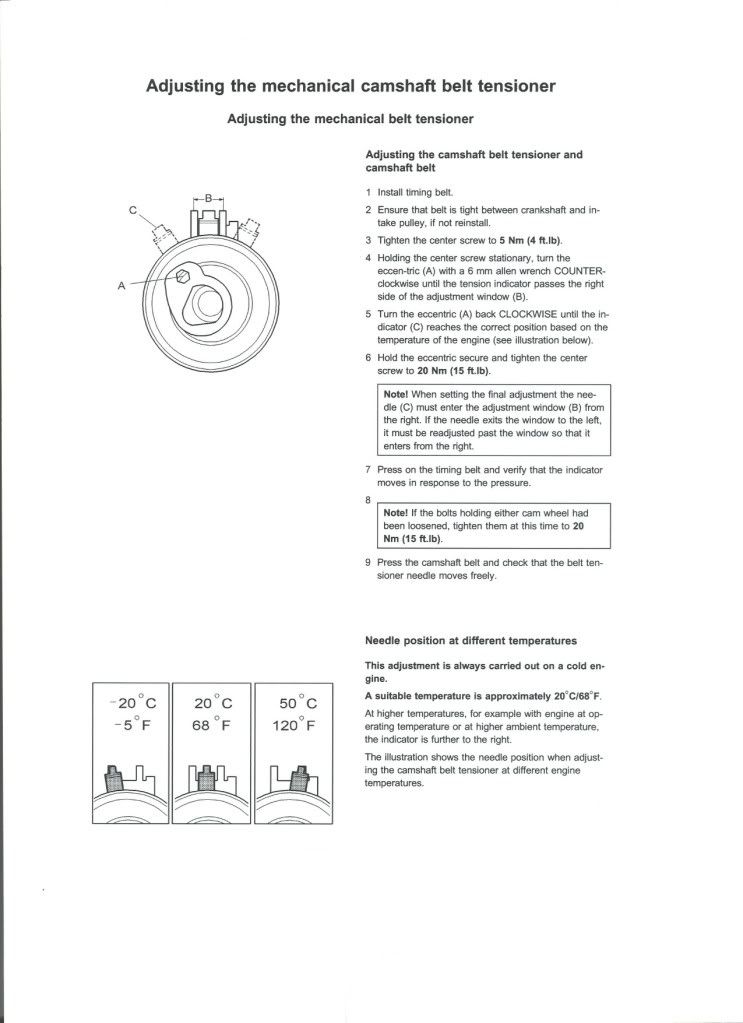
Now install the new belt. After the ordeal with the water pump gasket I kinda stopped taking pictures after this so I apologize. I lowered my new belt in from the top through the area where the alternator belt is. I went counter clockwise when installing my belt. I first got it on the crank sprocket ensuring that my transferred belt marks lined up, I then went over the idler, right cam, left cam water pump, and finally the tensioner. This was a pain, but I loosened the tensioner all the way and was able to get it on. I had to keep tight tension all the way around as I went counter clockwise. This is where the cam locking "tools" really paid off because I was able to keep tension on the belt without worrying about moving the cams. This took me a few tries with a dinner break in between. With the new belt on, follow the steps to tension it. I ignored the step where it says turn to Counter CLockwise because I had already done that to get the belt on. Clockwise is the way that tensioned mine. Be sure to turn it past the marks clockwise, the back to the correct temperature setting. I had a hard time seeing mine so I stole a makeup mirror from my wife and placed it on the tensioner and lined it up from above.
![Image]()
![Image]()
![Image]()
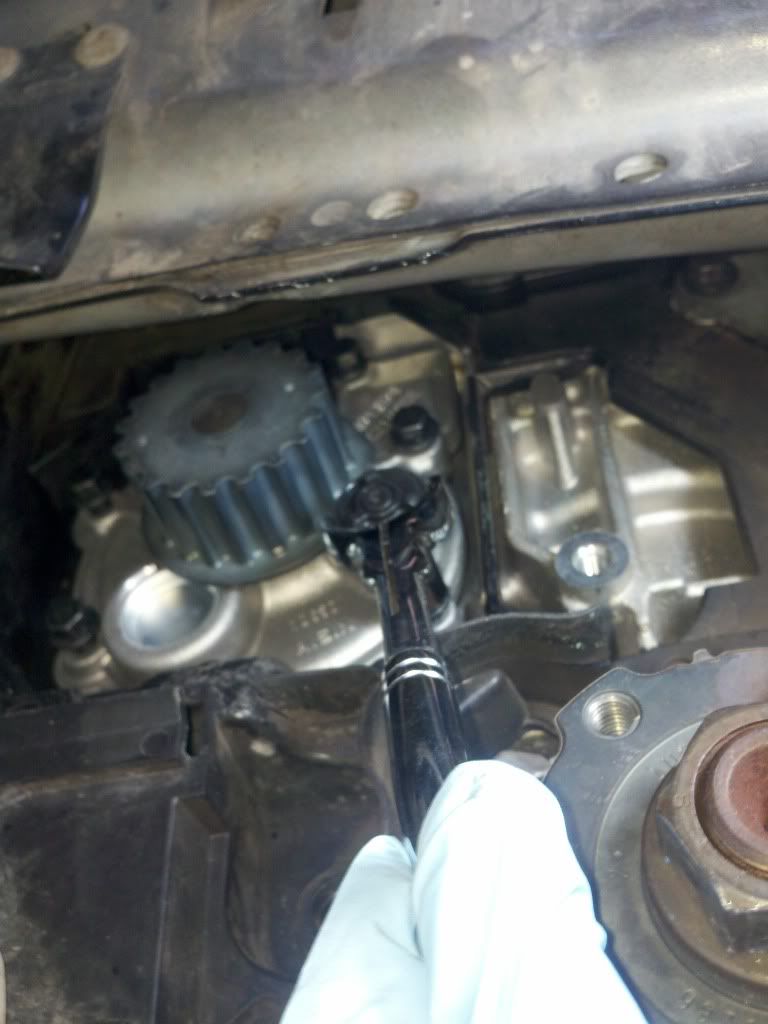
With the new belt on all that is left is putting everything back together. Make sure to rotate the engine clockwise through at least two revs to make sure the timing marks still line up. You can also check for interference when doing this. I dont know what that feels like, but I'm told you will notice it if it happens. I rotated mine half a dozen times, and then put the large 30mm socket on an 18v drill and rotated it a little faster to see how everything moved and to make sure nothing came apart. Obviously be careful when doing this.The Center nut is torqued down to 133 ft lbs or 180 NM. Make sure to have some kind of brace to hold the crank from spinning. I used the rest of the aluminum from my cam locking tool but it didnt work very well and bent alot, but got the job done. The picture shows it braced against the drive axel which didnt work, but if you rotate it to the 10-11 o clock position there is a ridge on the frame in front and back that worked for me. If someone found an easier way let me know.
![Image]()
I filled radiator with only distilled water and then later followed this guide for flushing the coolant. Be careful if doing this in the winter so that you water does not freeze in the radiator.
Once the motor mounts were installed and the water was filled I had someone start the car so that I could see how the belt walked at full speed. Mine shifted a bit but finally settled close enough to center of the cams. Make sure that It does not walk off the cams too far and rub against something. After this its just put the covers back on and you're good to go.
Keep in mind if using this I am no mechanic, and If you do this job wrong you could ruin your engine. That being said it really wasn't that hard. I saved a ton of money doing this my self even after buying a bunch of new tools including torque wrench, jack, and sockets. Feel free to ask any question or make any corrections if I did something out of order. It took me a few days to put this write up together as classes have started and I'm pretty busy.
The whole job took me about a week:facepalm: but 2 days of that were spent playing starcraft 2, and another 2 days were spent getting tools and waiting for a gasket that I broke. I feel pretty confident that I could do this in a day if I were to do it again. I am not a mechanic, in fact this was also the first time I changed spark plugs or have done anything this complicated but I was an electrician before going back to school so I know my way around tools.
Feel free to make any corrections at the end if you see something that was wrong or could have been done easier.
Break the lug nuts so that they are easy to remove and then jack up the car safely and place it on jack stands, making sure to chock the wheels.
Start by following this guide to remove the spark plugs. This is not necessary but it makes it much easier to rotate the engine and line up timing marks as you are not fighting against compression.
If you are changing the water pump as well, drain the coolant. This is done by loosening the red spigot at the bottom of the radiator. Remove the water pump reservoir by pulling straight up and zip tie it out of the way.
Remove the wheel and the inner liner. It consists of 3 pieces and requires torx and 10mm nuts.
(I had to remove these pictures because you can only have 30 per post, this is really straight foreward though)
Break free the four bolts holding the passanger side motor mount so they are easy to remove. Next place a hydraulic jack under the engine with a 2x4 or larger to displace the weight across the oil pan. I also made a T block out of extra wood just in case the jack failed or lowered without me noticing. Put enough pressure on the jack to hold it up, but dont force it as the motor is still attached by the motor mounts.
Remove the two bolts holding the engine to the shock tower. With these removed you can jack the motor up a few more pumps until it is suspended a few cm over in the air. Once suspended finish removing the motor mount. This gives clear access to the rest of the timing belt covers.

Here is the bolt for the lower timing belt cover that can be accessed after removing the motor mount.
-again photo removed to get to limit, if you cant find this bolt put everything back together and take it to someone who can
Next remove the belt that goes from crank pulley to the ac compressor. This is done by using a T50 (if i remember right) torx and rotating the tensioner clockwise. It is kind of a pain to get the belt off but possible. A larger ratchet makes this easier. I decided to replace both belts while I had everything apart. I paid 100 for these at a dealership but they are about half that online. (Lesson Learned!
). I also forgot to take a picture of the second belt removal process because I accidently used a T45 and stripped out the torx slot in the alternator tensioner, but I used a hammer and tapped the T50 into place enough to get that belt changed. 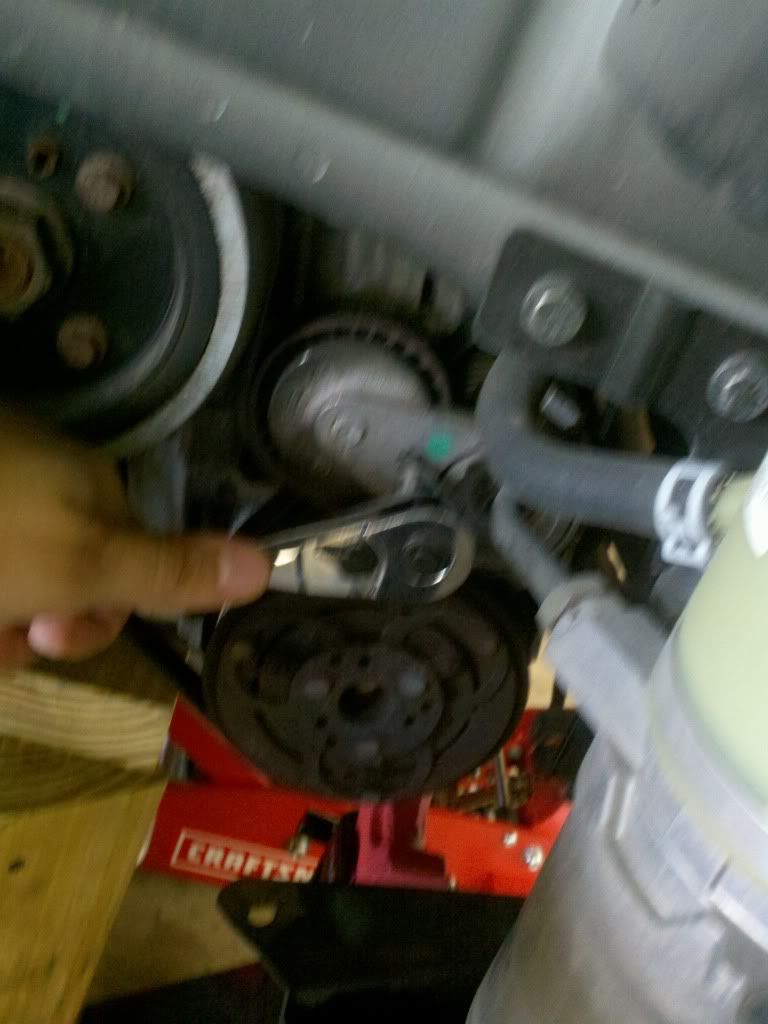
With the belts removed it is now time to remove the harmonic balancer. This is done by removing the 30 mm large center nut and four 10mm nuts around it. I was lucky to have a friend with a large compressor and an impact gun. Even with that it took a few hits with the gun to get it broken free.
With the large nut and 4 bolts removed now you have to get the pulley off. The spot that seemed to stick on mine was the alignment post, seen in the previous picture as a rusty circle at the 1 o-clock position. Make sure to spray this with some JB weld as soon as possible. A dead blow hammer will also help. I rented a harmonic balancer puller kit from auto zone, but this is probably the wrong method of removal because it actually pulled the crank sprocket off of its splines by about a 1/4 inch requiring me to hit it back into place with a dead blow hammer. I would refer to the original guide's method of removal.
With the balancer pulley removed, you can put the 30mm nut back on and use this to rotate the engine until all three timing marks are lined up. I was unsure of my upper marks at first thinking they were possibly a tooth off, but after locating the bottom mark and lining it up perfectly the upper marks looked dead on. I used a large roofing crayon to make the upper marks easier to see.
On the cam sprocket, the raised bump on the outer surface lines up with the raised boss on the oil pump. The upper marks are small lines cut in to the face of the cam sprockets, and these line up with notches in the plastic upper cover of the timing belt. Make sure this plastic cover is perfectly in place before trying to line up the marks. As said eairler, I lined up the bottom mark first then check the top two to see how they looked.
Crank pulley shown with red arrows pointing to alignment marks that are correctly alligned.

Top cam pulley's with allignment marks that are correctly alligned. As you can see they are not 100% dead on, but you are lining them up with a piece of plastic...
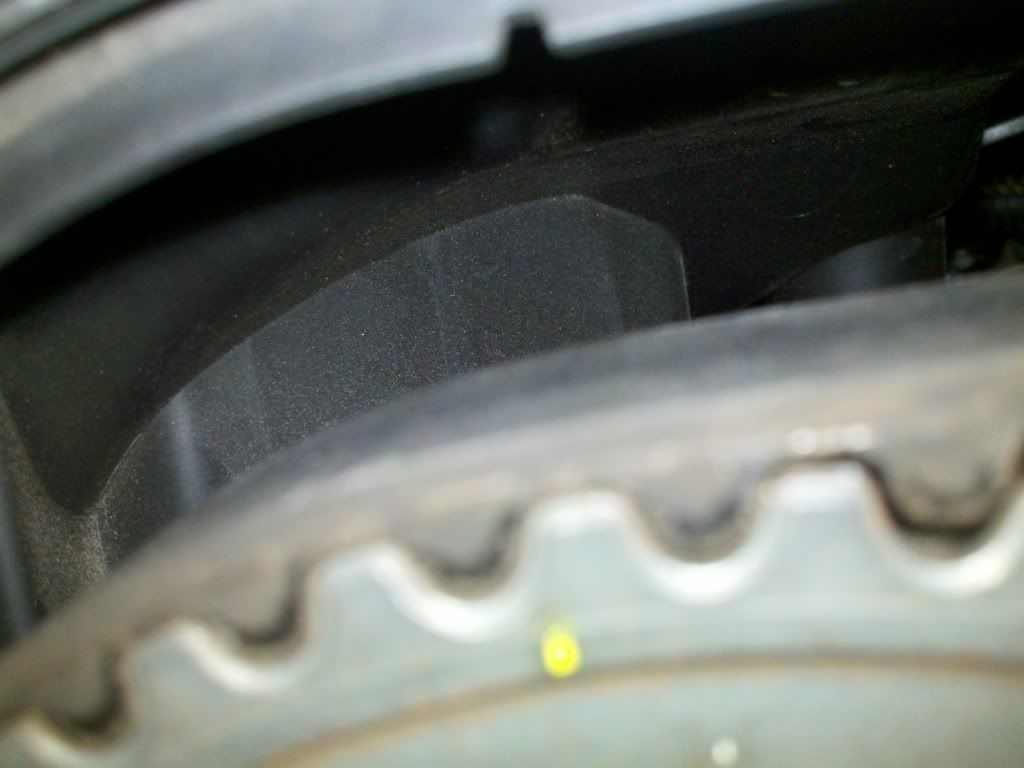
The left cam is hard to see with everything in the way, I made an additional mark on the top of the plastic cover and could then see by looking straight down that they were aligned.
Before removing the timing belt, I decided to make a cam-shaft holding tool rather than purchasing one. You could go either way. It is not necessary to do this, but I would really recommend it because once locked in place you dont have to worry about them moving. Also, the new belt is a pain to get on so with the cams locked you can actually use them for leverage when trying to get the new belt back on. I used two methods of locking it in place. The first is simply a threaded rod cut to fit between the gears. I then got two rubber stoppers and cut them to fit. I drilled a hole in the rubber stoppers so that they would fit over the threaded rod and then slid two nuts with washers to push the rubber stoppers outwards against the cams. The second was two pieces of aluminum and four nuts and bolts. I took one piece of aluminum, held it against the cams, and marked where the indents of the teeth were. I then drilled holes so that the bolts would sit in the groves and prevent it from rotating. It worked really good. As you can see it took me a few tries to get the holes how I wanted them.
Before removing the belt, I made a few extra marks on the cams and crank and engine block so that I was sure nothing moved during the process. I forgot to take pictures of these. I also made marks of which teeth went in certain spots and transferred these to the new belt. This made me more sure that I was putting the new one on correctly.
To get to the belt tensioner it is easier to lower the engine first. Be careful that you dont lower it too much. The first pinch point I could see was the drive axel on the control arm. ( I think that is what they are called.) I was able to lower my engine until these almost touched. I also cut a notch in my wooden T block to allow for lowering. Before lowering you will notice about a 1 or 2 inch gap between the axle and control arm, here is what it looks like after lowering.
After Lowering.
You can now reach the tensioner. Insert a 6mm allen key into the slot and loosen the tension. Mine broke when I did this so I either rotated it the wrong way or It was going to break anyways so Im glad I'm changing it. For some reason my picture of this did not come out. With the belt off you can now replace the water pump (if you want to), tensioner, and idler pulley. The idler pulley is eaiser to remove with the engine raised up to its top position. While you have the engine up, also break free the few top bolts on the water pump. I bought a 1/4 in socket wrench with a pivoting head and it worked perfectly for this.

With the idler changed and top bolts of water pump broken, Lower the engine for better access and finish removing the water pump and old tensioner. The tensioner only has 1 bolt. When replacing this only tighten it hand tight. Getting the water pump out is a pain, but it does fit. Make sure to clean all of the old gasket off of the block. I used water and an abrasive pad. Make sure to have a small bucket handy as some coolant will drain out of the water pump.
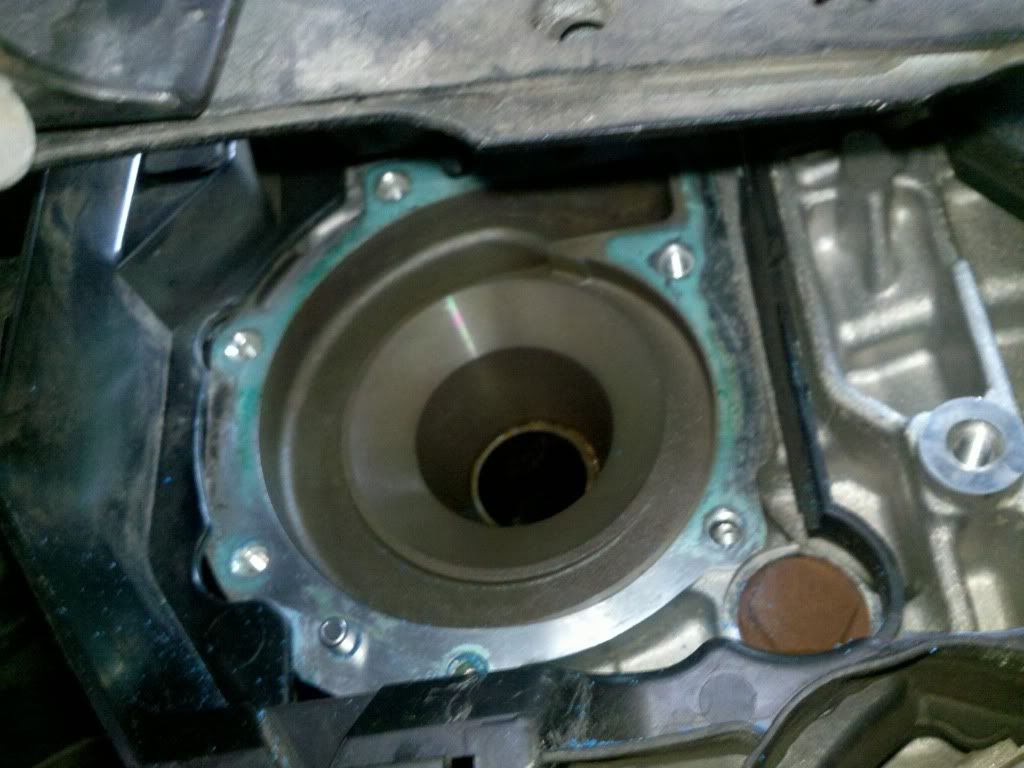
I tried to install the new water pump by gluing the new gasket to the back and installing it but it is such a tight fit that it ripped in the process! You can see in the last picture a placement pin that the the water pump slides on, there is another one at the bottom. My trick in getting the new pump and gasket on was to wet the gasket and block with water so that the gasket will somewhat stick in place to the block. Set it in place over the locating pins and just be careful that it didn't move when you finally get the new pump in place. I slowly inserted each bolt to make sure that the holes were still lined up. This may take a few tries. Notice that there is two slots that are rubber on the timing belt guard that you can use in getting the new pump in and out, I am pointing to these.

The bolts on the water pump are rated for 7ft lbs and 10NM. I could only get a torque wrench on the bottom bolts but I used this to make a best guess for the rest of the bolts. Make sure to tighten it in a star pattern to ensure that it sits flatly on the block.
Now install the new belt. After the ordeal with the water pump gasket I kinda stopped taking pictures after this so I apologize. I lowered my new belt in from the top through the area where the alternator belt is. I went counter clockwise when installing my belt. I first got it on the crank sprocket ensuring that my transferred belt marks lined up, I then went over the idler, right cam, left cam water pump, and finally the tensioner. This was a pain, but I loosened the tensioner all the way and was able to get it on. I had to keep tight tension all the way around as I went counter clockwise. This is where the cam locking "tools" really paid off because I was able to keep tension on the belt without worrying about moving the cams. This took me a few tries with a dinner break in between. With the new belt on, follow the steps to tension it. I ignored the step where it says turn to Counter CLockwise because I had already done that to get the belt on. Clockwise is the way that tensioned mine. Be sure to turn it past the marks clockwise, the back to the correct temperature setting. I had a hard time seeing mine so I stole a makeup mirror from my wife and placed it on the tensioner and lined it up from above.

With the new belt on all that is left is putting everything back together. Make sure to rotate the engine clockwise through at least two revs to make sure the timing marks still line up. You can also check for interference when doing this. I dont know what that feels like, but I'm told you will notice it if it happens. I rotated mine half a dozen times, and then put the large 30mm socket on an 18v drill and rotated it a little faster to see how everything moved and to make sure nothing came apart. Obviously be careful when doing this.The Center nut is torqued down to 133 ft lbs or 180 NM. Make sure to have some kind of brace to hold the crank from spinning. I used the rest of the aluminum from my cam locking tool but it didnt work very well and bent alot, but got the job done. The picture shows it braced against the drive axel which didnt work, but if you rotate it to the 10-11 o clock position there is a ridge on the frame in front and back that worked for me. If someone found an easier way let me know.
I filled radiator with only distilled water and then later followed this guide for flushing the coolant. Be careful if doing this in the winter so that you water does not freeze in the radiator
.Once the motor mounts were installed and the water was filled I had someone start the car so that I could see how the belt walked at full speed. Mine shifted a bit but finally settled close enough to center of the cams. Make sure that It does not walk off the cams too far and rub against something. After this its just put the covers back on and you're good to go.
Keep in mind if using this I am no mechanic, and If you do this job wrong you could ruin your engine. That being said it really wasn't that hard. I saved a ton of money doing this my self even after buying a bunch of new tools including torque wrench, jack, and sockets. Feel free to ask any question or make any corrections if I did something out of order. It took me a few days to put this write up together as classes have started and I'm pretty busy.