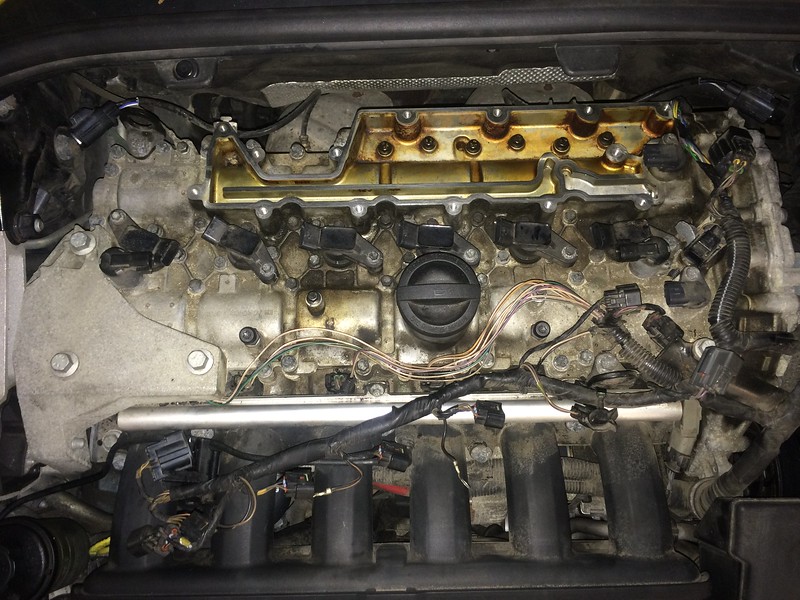
This thread will go over how to diagnose and replace a failed PCV (Air Handler) on any 3.2 S80/V70/XC70/XC60.
Diagnosis: High pitch whistle that starts 30-60 seconds after starting your car and will temporarily go away under load/acceleration, but comes back under idle/vacuum.
This is the rubber diaphragm that fails. I did find a few sources of just this rubber piece for $30-40. The chances of removing the brittle and oil soaked cap holding it in without it shattering into pieces are pretty slim. Photos of what causes that awful whistle.


Difficulty rating: 2
Time: 60-90 minutes (30-45 if you rush)
1- Replacing Wipers
5- Replacing Control arm
10- Replacing Timing belt
Parts needed:
Volvo Part# 31319642 Dealer cost $170-200+, Tascaparts.com cost $147+shipping (comes with new gasket)
Land Rover# LR023777 Dealer Cost $110-180+, Landrovermildford.com cost $130+shipping (comes with gasket)
- Get the Land Rover part, its a Volvo part in a Land Rover box for less...
**Hint- This a good time to replace the brittle plastic heat wrap around all the wire looms as they will likely crumble in your hands.
-Electrical tape
-Wire looming


Tools needed:
1/4" T-30 Bit
1/4 Extensions 1" & 3"(depends on your T27 bit length)
1/4 Swivel extension
1/4 Ratchet driver
Can of brake cleaner
Clean rag
Magnetic bowl
(Vacuum - incase your engine bay is dirty)
I found it best to do this with the engine cold and after it has been sitting overnight or a few hours.
Step 1: Open hood and remove engine cover, put aside/in trunk for safe keeping.

Step 2: Locate PCV and unplug the solenoid on the left side of the PCV, also unclip the O2 cable on the right side of the PCV.
***Hint this is a good time to clean up the area around the PCV. Chances are the failed PCV has sprayed oil all over the place. Wipe all the cables clean and vacuum up all the debris from the crumbled wire looms.

Step 3: Start removing the 12 T-27 screws and place them into your magnetic bowl ( the back 4 will require the 1/4 swivel extension)

Step 4:Clean out the gunk inside the valley and wipe the perimeter where the new seat makes contact with brake clean.

Step 5: Place new PCV and re-install the 12 T-27 screws. I couldn't find a torque spec but the screws stop so I went 1/4 to 1/2 turn extra after fully seating them starting from the center and working my way out in both directions. (BMW uses plastic valve covers and have a torquing sequence to avoid warping the plastic prematurely)
Step 6: Re-install the engine cover, put away your tools, clean your hands, start the engine and listen to how nice and quite it is! (Unless you have some other issues going on
Diagnosis: High pitch whistle that starts 30-60 seconds after starting your car and will temporarily go away under load/acceleration, but comes back under idle/vacuum.
This is the rubber diaphragm that fails. I did find a few sources of just this rubber piece for $30-40. The chances of removing the brittle and oil soaked cap holding it in without it shattering into pieces are pretty slim. Photos of what causes that awful whistle.


Difficulty rating: 2
Time: 60-90 minutes (30-45 if you rush)
1- Replacing Wipers
5- Replacing Control arm
10- Replacing Timing belt
Parts needed:
Volvo Part# 31319642 Dealer cost $170-200+, Tascaparts.com cost $147+shipping (comes with new gasket)
Land Rover# LR023777 Dealer Cost $110-180+, Landrovermildford.com cost $130+shipping (comes with gasket)
- Get the Land Rover part, its a Volvo part in a Land Rover box for less...
**Hint- This a good time to replace the brittle plastic heat wrap around all the wire looms as they will likely crumble in your hands.
-Electrical tape
-Wire looming


Tools needed:
1/4" T-30 Bit
1/4 Extensions 1" & 3"(depends on your T27 bit length)
1/4 Swivel extension
1/4 Ratchet driver
Can of brake cleaner
Clean rag
Magnetic bowl
(Vacuum - incase your engine bay is dirty)
I found it best to do this with the engine cold and after it has been sitting overnight or a few hours.
Step 1: Open hood and remove engine cover, put aside/in trunk for safe keeping.

Step 2: Locate PCV and unplug the solenoid on the left side of the PCV, also unclip the O2 cable on the right side of the PCV.
***Hint this is a good time to clean up the area around the PCV. Chances are the failed PCV has sprayed oil all over the place. Wipe all the cables clean and vacuum up all the debris from the crumbled wire looms.

Step 3: Start removing the 12 T-27 screws and place them into your magnetic bowl ( the back 4 will require the 1/4 swivel extension)

Step 4:Clean out the gunk inside the valley and wipe the perimeter where the new seat makes contact with brake clean.

Step 5: Place new PCV and re-install the 12 T-27 screws. I couldn't find a torque spec but the screws stop so I went 1/4 to 1/2 turn extra after fully seating them starting from the center and working my way out in both directions. (BMW uses plastic valve covers and have a torquing sequence to avoid warping the plastic prematurely)
Step 6: Re-install the engine cover, put away your tools, clean your hands, start the engine and listen to how nice and quite it is! (Unless you have some other issues going on


