SwedeSpeed - Volvo Performance Forum banner
21 - 40 of 116 Posts
Discussion starter · #21 ·
Thank you again for the info. Bumping this thread hoping for more fun updates.
Update:

My family and professional commitments have taken priority lately, and I'd rather discuss what I have done, instead of what I plan to do, but here are some projects in the works.

1. Maxton Designs Aero Kit. I am converting the front splitter, side skirts and rear bumper sills from simple decorative shells to fully functioning ground effect units. Its slow going. On the rear and side skirts I filled the voids in with high expansion foam and then skim coated the underside with epoxy resin. I even threw in a strip of carbon fiber to reinforce the foam, which was total over kill. I may convert the front splitter to a track only unit, not sure yet. The Maxton Design Aero products are a great looking product, I like the design, but they do not provide any aero effect in OE form.

2. Tuneable suspension: I have the Silverproject adjustable camber plates sitting on the bench and a set up Hardrace rear suspension components are shipping soon after a three month production wait. This will allow me to adjust camber and caster on the front struts and camber and toe on the rear.

3. Meth injection. I think this is in my future.

4. Elevate Cars. They have several new products under development in the intake-exhaust stream. Watch for those.

5. Track Days: Willow Springs on 1/23, and I may try my hand at a time-attack event, I just don't know if I want to pay the price in tires and brakes to see what the P* can do.

6. Front brake shoes. I will need a set soon and can't decide between OE or Porterfields 4Rs. The OE's are $550 USD a side, that just seems ridiculous.

I need to spend more time on my car and less time at the keyboard. Thanks for asking.
 
Well your time spent on the keyboard is much appreciated as you write tech content with a level of clarity, detail, and care that is largely missing in the P3 community. Keep up the good work. I am really looking forward to hearing your ideas on water/ meth injection. I plan on running it eventually but I’d be much more comfortable doing so if I could follow someone else’s recipe to a tee.
 
The Maxton Design Aero Kit looks intriguing!
 
Discussion starter · #25 · (Edited)
Also installed the front lip and side skirts from Maxton Designs. The original MD designs are cosmetic aero, they are a styling addition only as they are a ABS shell with no flat underside. I am in the process of converting the set to functional aero. The side skirts in this photo were filled with 2 pound foam, a layer of fiber glass resin and then skim coated with body putty, sanded smooth and painted flat black (See below). I have also done the rear bumper skirts. The lip is next...

2-16 V60 P* by lcfpolestar, on Flickr

Finished modification (click to play video):

Maxton Designs modified side skirts by lcfpolestar, on Flickr

In production:

Side skirts in production by lcfpolestar, on Flickr
 
Discussion starter · #27 ·
I did. For my car I think it needs to be painted to match and I just haven't done that yet. I also filled in the rear skirts and have not installed them. I have some plans in this area for the car but they are back burner for now.
 
Discussion starter · #28 ·
I'd like to open this post by stating that I am a biased reviewer. I've been associated with Elevate Cars off and on over the last few years and my relationship started even before I purchased my P*, back when I was assisting my son with his C30 (https://www.instagram.com/levolvolagt/). My car was the test fit model for the development of this product, and you will see my car on the Elevate Website.

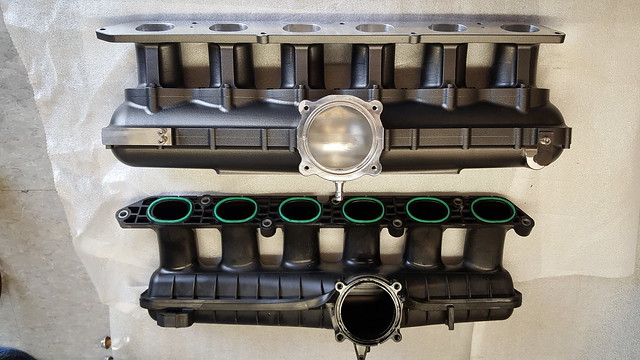
After three years of research and production development, Elevate has released a high performance aluminum intake manifold for the Volvo T6 engine. The individual who did the majority of the design work and CAD software development, as well as runs the CNC machine that cuts out the manifold, previously did intakes for several well known motor-sport teams. The part is a direct bolt on replacement and will take the average owner about thirty minutes to install. This intake comes with a new pipe for the connection between the throttle body and the IC hose, as the intake portion of the manifold is now centered to the runners, unlike the OEM unit which is offset to the right, creating an unbalanced flow right off the bat. The intake also includes titanium fasteners. The intake is available in a variety of finishes w/ or w/o the Elevate logo. Machined from solid billet aluminum, the unit has very high quality fit and finish.

I encourage you to do some online research of easily found information on the engineering behind performance intake manifolds, and then visit the Elevate website (link below) to see their extensive explanation of the design engineering behind this product, as you will see that Elevate followed many of the generally accepted best practices in intake design to produce this product.

I am running this intake on my 2016 P* T6 engine which is equipped with; a Ferritta DP, Elevate "J" intake pipe with the Elevate dual port eCRV and waste gate, OEM ECU (no tune or chip), OEM wave plastic intake and OEM filter box equipped with a BCM high flow filter.

I've had the intake on about three weeks and have driven a combination of city, freeway and canyon roads. My immediate, and lasting first impression is all about the immediate throttle response. Gone is the historic slight hesitation when accelerating, the engine just surges immediately and the revs just climb effortlessly. Literally the engine just lights off when you get on it. The sound is wonderful. I am not sure if I'm hearing it from the tailpipe or the engine bay, or both, but the audio feedback simply sounds amazing. The engine is so "racy", you'll keep looking for opportunities to get on it so you can listen to the notes and watch the revs fly. It's that good. And this is without any aftermarket ECU tuning. I think the intake and a DP is a marriage made in heaven, which makes total sense, high flow in/high flow out, they compliment each other.

Of course people are asking about HP gains. Elevate has decided to be conservative in this area, and let the owners post results. As for me, I intend to install a Mark's Auto Performance inter-cooler (https://www.facebook.com/marksautoperformance/) and a Hilton Tune (https://hiltontuning.com/), both already purchased, and see where I land. But truly it doesn't matter, because like my DP, I would never give this intake up, because of how well the engine performs when its onboard. It's that good. No CEL's, no ECU integration issues. In the compariosn photos below it looks the Elevate intake is twice the size of the OEM, and would never fit. But trust me it does, and the increase in plenum space is part of the magic.

Elevate T6 Intake Manifold by Oscar Pair, on Flickr

OEM-Elevate Comparison by Oscar Pair, on Flickr

OEM vs Elevate Intake Manifold by Oscar Pair, on Flickr

Elevate T6 Intake Manifold by Oscar Pair, on Flickr

https://www.elevatecars.com/store/v...e-volvo-p3-t6-3-0l-billet-performance-inlet-manifold-gloss-black-with-logo.html
 
Discussion starter · #29 ·
I have experienced torque rod bushing failure on previous Volvo's I've owned so when I spotted this upgraded aftermarket part from IPD I jumped at the chance to upgrade the torque rod on my 2016 P*. This is an easy swap, I popped out the coolant tank to gain access to the bolts securing the torque rod. Because of the stiffness of the bushings, you can feel the engine rock back in forth through the range of motion in the slotted end of the torque rod. To quiet this down a bit I did a small tweak: I cut a short piece of vacuum hose in half length wise and inserted each half on either side of the engine bolt that passes through the slotted portion of the rod. This acts as a mini dampener inside the slot, it still allows the engine to rock back and forth, but quiets the landing on each end. There is another torque rod on the bottom of the engine, with the same bushing design as the OEM upper unit, I'd like to see a upgrade for this rod as well.

https://www.ipdusa.com/products/215...4-volvo-hd-billet-polyurethane-upper-engine-torque-mount-p3-ipd-139884-31670126

20190512_214218 by Oscar Pair, on Flickr

Note: the white graphic denotes where the 1/2 section of vacuum line is inserted.

IPD Upper Torque Rod Installed ON P3-T6 by Oscar Pair, on Flickr
 
These are exactly the sort of outstanding updates I’d come to expect from you and had missed in your absence. Keep em coming and keep up the great work! I’ll probably have some additional questions when there’s time but right now I’m about to change a diaper, haha
 
Discussion starter · #32 ·
I have experienced torque rod bushing failure on previous Volvo's I've owned so when I spotted this upgraded aftermarket part from IPD I jumped at the chance to upgrade the torque rod on my 2016 P*. This is an easy swap, I popped out the coolant tank to gain access to the bolts securing the torque rod. Because of the stiffness of the bushings, you can feel the engine rock back in forth through the range of motion in the slotted end of the torque rod. To quiet this down a bit I did a small tweak: I cut a short piece of vacuum hose in half length wise and inserted each half on either side of the engine bolt that passes through the slotted portion of the rod. This acts as a mini dampener inside the slot, it still allows the engine to rock back and forth, but quiets the landing on each end. There is another torque rod on the bottom of the engine, with the same bushing design as the OEM upper unit, I'd like to see a upgrade for this rod as well.

https://www.ipdusa.com/products/215...4-volvo-hd-billet-polyurethane-upper-engine-torque-mount-p3-ipd-139884-31670126

20190512_214218 by Oscar Pair, on Flickr

Note: the white graphic denotes where the 1/2 section of vacuum line is inserted.

IPD Upper Torque Rod Installed ON P3-T6 by Oscar Pair, on Flickr
The yellow bushing in the torque rod comparison photo is an aftermarket "insert bushing", the insert is an improvement over OEM alone, and the IPD is an improvement over the insert/OEM approach.
 
Discussion starter · #33 ·
These are exactly the sort of outstanding updates I'd come to expect from you and had missed in your absence. Keep em coming and keep up the great work! I'll probably have some additional questions when there's time but right now I'm about to change a diaper, haha
Oh, thanks so much for the compliment! Yes, I was away from this Forum for awhile, I am planning to be more active now.
 
Discussion starter · #35 ·
My C30 son (https://www.instagram.com/levolvolagt/?hl=en) was home for the holidays and with his help we made short work of installing the Mark's Auto Performance (MrkA/P) intercooler for the T6. This IC is considerable larger than the OEM unit, yet fits into the same space and unlike the do88 unit I had before does not restrict air flow to the radiator. I decided to keep the cooling fins in native aluminium and paint the side tanks in flat black. We did a short test run; running a stock ECU, turbo and the Elevate Intake Manifold I was able to pull 19.5 lbs of boost. No CEL's or other issues. A Hilton Tune is next.

https://www.facebook.com/marksautop...RBvAYzpdIYryYEuurtlp9uFxTLiqUolvlGyqYjg4OxVI7Jw_7Zt7k_bj71a9V0y5Y86RNtieKrahhBK

20191224_153035[1] by Oscar Pair, on Flickr

80416219_833238253761172_6057160397222313984_n by Oscar Pair, on Flickr

20191223_145304[1] by Oscar Pair, on Flickr

20191223_143607[1] by Oscar Pair, on Flickr
 
Outstanding. I hope I haven't made a huge mistake with the do88 intercooler I just installed. Although I know you have stacked the additional oil and trans coolers too...which would obviously add to the total airflow restriction to the radiator.

Your additions never cease to impress.
 
Discussion starter · #37 ·
Outstanding. I hope I haven't made a huge mistake with the do88 intercooler I just installed. Although I know you have stacked the additional oil and trans coolers too...which would obviously add to the total airflow restriction to the radiator.

Your additions never cease to impress.
Well thank you for the compliment!

I think you should see how your car behaves with the do88 and go from there. Although it gets summer hot in KS, many months of the year it is quite cold where as in LA we can have prolonged spells over 100F and lots of stop and go traffic driving. I have since gone back to my OEM oil cooler and left my aux Setreb in place. Maybe if I start running a lot of track time I will re-connect but for now I am back to the OEM cooler for engine oil, I am still running the aux trans cooler. To add the aux coolers meant I had to give up the do88 as I needed that space to fit everything.

I found this article from Verus Engineering to be really insightful:

https://www.verus-engineering.com/single-post/2016/07/10/Oil-Cooling-A-Deeper-Look
 
Discussion starter · #38 · (Edited)
I've always been an old school carnauba wax guy when it comes to paint protection. I never favored the "glass like" look of ceramic nano coatings. This all changed, and I became a ceramic convert, after discussing ceramic coatings with Nxt Level Detailing in Tustin CA (@nxtleveldetail). They convinced me they could apply a ceramic coating that would deliver the protective values ceramics are famous for, and match my old school luster preference. Over a three day period, they completed a two step paint correction process and then applied a coating of Feynlab Ceramic V2. The car looks brand new, and the ceramic coating is so hydrophobic that nothing sticks it. Road grim and air pollution dust just roll off.

The paint correction process involves five basic steps: a decontamination wash, followed by a clay bar treatment, then an abrasive compound to remove clear coat swirls, then a polish and finally the application of the ceramic nano coating. This is very labor intensive, with NxtLevel working one panel on the car at a time. They have an electronic device that measures the depth of the clear coat so they can monitor how deep they can go in removing swirl marks and scratches. On my hood I have a couple of fairly deep scratches that are all the way through the clear coat. They could not remove those, but after their overall treatment, you can hardly see them. This level of paint correction performed by a professional is expensive, prices vary but in Los Angeles this level of service ranges between $1,200-$2,000.

They also gave me the level of "luster" I wanted, by controlling the top coat they use. The results look more like wax then the "glass layer" I've seen on some ceramic coated cars, and that is what I requested. The car looks amazing, like it just came off the showroom floor, and my car is four years old. Besides looking great, the car finish sheds everything. I would say it accumulates road and air pollution grime at a rate about about 1/3 less than with my previous wax treatments.

I am new to ceramic coatings so I cannot compare the performance of Feynlab products to others, here is the product description: https://www.feynlab.com/product/feynlab-ceramic-version-2/

Going ahead, I'll be monitoring the long term performance of this product and will post some impressions along the way.

IMG_4517_1579898694590 (1) by darkthirtydiver, on Flickr

NXT Level Detailing by Jeff Reeb, on Flickr

Untitled by Jeff Reeb, on Flickr
 
Thanks for your luxury pics - i like them really much and also your style with the front grill, yes there are some ceramic coatings with a smooth finish...., however, a wet looking wax will always have a better smell than a chemical ceramic coating...
 
Discussion starter · #40 ·
Thanks for your luxury pics - i like them really much and also your style with the front grill, yes there are some ceramic coatings with a smooth finish...., however, a wet looking wax will always have a better smell than a chemical ceramic coating...
Yes, I do enjoy the old school smell of a fresh wax job, takes me back home. Waxes and ceramics do look different, but this ceramic looks much closer to a wax finish in natural light then it indicates in the photo, and offers the performance of a nano coating. Both have there place for sure.
 
21 - 40 of 116 Posts