SwedeSpeed - Volvo Performance Forum banner

1972 142E Fuel Tank

1 reading
2.9K views 5 replies 3 participants last post by  scaramoucheii  
#1 ·
Recently acquired '72 142E with B20F and D-Jet system still installed. Searching for a replacement fuel tank as current one may not be salvageable. Question: is this fuel tank unique to the '72 model year? Or can tanks from other 142E years be used? For example, I understand that the suction tube on on a '72 is 7/16" but the suction tube on the '71 142E is 5/16". Does the "71 tank otherwise fit into the '72? Are there performance penalties if using a smaller suction tube??

Would also be interested in getting a new replacement tank but so far they seem to be made of "unobtainium".

TIA for any insights to be offered!
 
#2 ·
The parts manual says that the tank part number changed through production. Up to 142 chassis number 277199 it was 683395. From chassis number 277200 it was part number 1213748. However, I think that may just be a change in the parts numbering system (switch from 6 to 7 digits) rather than a change in the actual part.

In 1973 (or 1974?) Volvo moved the tank out of the trunk floor (rear crash issues) and those later tanks will definitely not fit. My 1971 142E has the large diameter hose between the tank and the pump so I expect that the 1971 tank is the same as the 1972 tank, or at least interchangeable. The part numbers for the tanks indicate that there are no reproductions / replacements available so I expect that you are faced with restoration of your tank unless you can find a salvaged one (unlikely).

My tank was in poor condition and I had to carry out a significant rehabilitation. I ended up cutting two large holes in the roof of the tank to access the interior for repairs, sand blasting and acid etching and I found a tank from a salvaged non injected 140 to provide round covers to seal up those access holes. On the Swedespeed 1800 forum, if you search back about 6 + years there were a few posts describing using electrolytic cleaning of P1800 E / ES tanks that seemed to be successful. I did my tank restoration about 10 years ago and used the POR 15 tank sealer kit to protect the interior and it seems to be standing up just fine.
 
#4 ·
I soldered up the patches on the access holes (and then pressure tested the tank) before I treated it with POR sealant. Once the tank has been coated with POR any subsequent repairs are going to be nearly impossible. You want to make sure that everything is fixed before putting the coating on.

Applying the sealer is a 'treat'. When you pour the sealer into the tank you need to repeatedly rotate the tank to make sure that all the internal surfaces are coated. Once you start you probably need to dedicate 1 - 2 hrs for relatively continuous activity before you drain out the excess sealant. There is no put it aside and go do something else for a while. The access holes I cut out were about 3 - 4" in diameter so they needed to be sealed up before I could do the rotations to coat the tank.

Unless your tank is in really bad shape, I would not cut the holes like I did. Cutting the holes and then cutting hte patches out of the top of the donor tank was a lot of work. I would try the electrolytic clean process first and then pressure test to see if you need further repairs followed by a tank sealer kit like POR 15 if it tests good. See if you can find a radiator shop that will clean your tank out. That used to be pretty common; but, 10 + years ago I could not find anybody who would touch my tank which is why I did it at home.

As a final note, if you do the POR 15 or similar tank sealer kit, be sure to have a small air compressor handy. You will want to periodically blow out the small diameter suction pick up tube and the fuel return lines to keep them clear and then give a good final blow after you have drained the surplus sealant out. A long section of pipe cleaner might be a good idea to have on hand to clean the ports. Make sure to clean any sealant off the threads of those ports before it set up - the stuff sets up rock hard. If you get some POR set up in your suction tube or the return line you are royally screwed!
 
#5 · (Edited)
On my 1800ES tank I had a donor car and I therefore had 2 tanks to work with. I had to repair the Pick Up Tube in the better of the 2 tanks so I cut 2 x hatches in the top of the tank, Approx 5 x 8 inches, One on either side of the internal baffle, Then made Hatch Covers from the identical areas from the donor tank. I then Electroliticaly cleaned all parts with Washing Soda electrolyte and 24VDC, re-brazed the pickup tube in place, and prepared the hatches with sheet metal screws by pre drilling the holes. Finally, used Permetex Aircraft Gasket sealant and closed up hatches with the sheet metal screws. (So hatches are removable) Finally the POR15 treatment as 142Guy described, Yes took about 2 hours for the internal POR application, and it seemed that almost all of it came out after but a Boroscope inpection indicated a very nice even coating inside.

Tank has been in the car a few years now and NO issues with the hatches. I do keep the tank as full as I can all the time.

I did the same POR process on my '73 142 tank, just no Hatches. I also completely re painted the exterior of the tanks with Gloss Black POR and then sprayed the underside with a couple of coats of rubberized undercoating. I have Pictures somewhere, and I will try and find them and post here. Note that my 142 is a Canadian Market B20B with twin SU's , but I did record the Tank part number and will look for that as well, (Not at home now so cannot go look in the trunk)
 
#6 ·
My Car's VIN is 1423348-367392

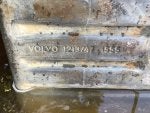
And my tank is a 1213747 1555

Note that my car is a B20B with twin SU's and cannot remember if there is a port blocked of that would have been the fuel return line fitting, but there is a vent line that runs up to the charcoal absorption tank in the trunk.

First Attached picture is from the Electolitic cleaning process, I would clean it then wire brush it, then roll it and repeat, took a few days to clean it.

Second pic shows the bottom of the tank after a coating of POR15, before the Rubberized undercoating
 

Attachments